Your Serverless Raspberry Pi cluster with Docker
This blog post will show you how to create your own Serverless Raspberry Pi cluster with Docker and the OpenFaaS framework. People often ask me what they should do with their cluster and this application is perfect for the credit-card sized device - want more compute power? Scale by adding more RPis.
"Serverless" is a design pattern for event-driven architectures just like "bridge", "facade", "factory" and "cloud" are also abstract concepts - so is "serverless".
Here's my cluster for the blog post - with brass stand-offs used to separate each device.
I'm writing a blog post on @docker and @Raspberry_Pi - it's probably never been easier to create a cluster and deploy code 🐝 pic.twitter.com/KD2MIIrAx9
— Alex Ellis (@alexellisuk) August 19, 2017
What is Serverless and why does it matter to you?
As an industry we have some explaining to do regarding what the term "serverless" means. For the sake of this blog post let us assume that it is a new architectural pattern for event-driven architectures and that it lets you write tiny, reusable functions in whatever language you like. Read more on Serverless here.
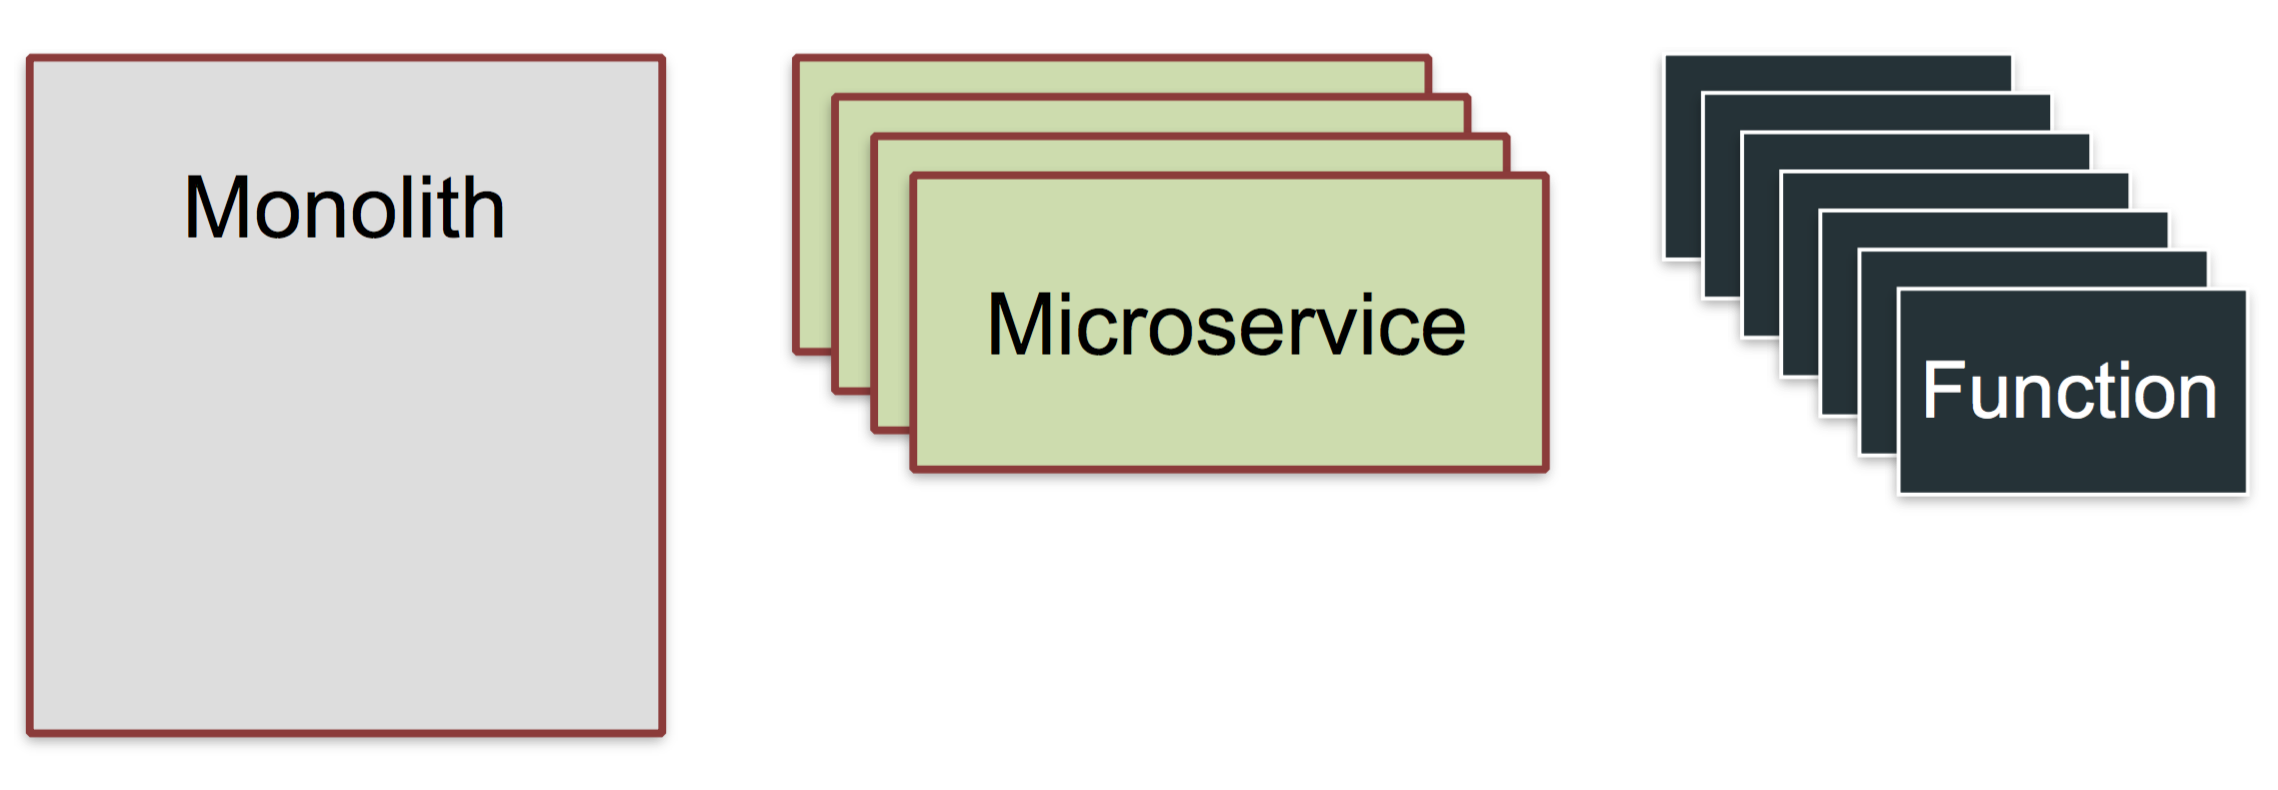 Serverless is an architectural pattern resulting in: Functions as a Service, or FaaS
Serverless functions can do anything, but usually work on a given input - such as an event from GitHub, Twitter, PayPal, Slack, your Jenkins CI pipeline - or in the case of a Raspberry Pi - maybe a real-world sensor input such as a PIR motion sensor, laser tripwire or even a temperature gauge.

Let's also assume that serverless functions tend to make use of third-party back-end services to become greater than the sum of their parts.
For more background information checkout my latest blog post - Introducing Functions as a Service (FaaS)
Overview
We'll be using OpenFaaS which lets you turn any single host or cluster into a back-end to run serverless functions. Any binary, script or programming language that can be deployed with Docker will work on OpenFaaS and you can chose on a scale between speed and flexibility. The good news is a UI and metrics are also built-in.
Here's what we'll do:
- Set up Docker on one or more hosts (Raspberry Pi 2/3)
- Join them together in a Docker Swarm
- Deploy OpenFaaS
- Write our first function in Python
Update: we've given the CLI an overhaul, it can now:
list,invokeand createnewfunctions from templates. Check it out here: Coffee with the FaaS-CLI
Docker Swarm
Docker is a technology for packaging and deploying applications, it also has clustering built-in which is secure by default and only takes one line to set up. OpenFaaS uses Docker and Swarm to spread your serverless functions across all your available RPis.
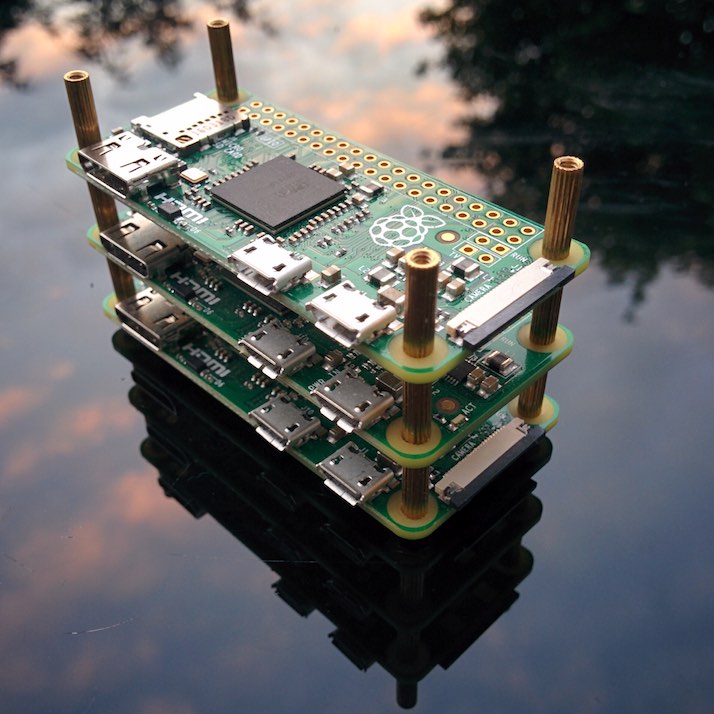 Pictured: 3x Raspberry Pi Zero
Bill of materials
I recommend using Raspberry Pi 2 or 3 for this project along with an Ethernet switch and a powerful USB multi-adapter.
- 2-8 Raspberry Pi 3
RPi2 or a mix of RPi2/3 will also work.
- 2-8 SD Cards
I use Class 10 Sandisk MicroSD cards in either 8GB or 16GB size.
- Ethernet Switch
Make sure you have an Ethernet Switch - this doesn't have to be gigabit, but it's preferable for re-use in future projects. You should have at least as many ports as RPis plus one for an uplink to your network.
- Bronze/Copper stand-offs
You can form the stacked structure I show in my image with bronze or copper stands-offs. These are called male screw columns and are extended versions of what you commonly find separating a motherboard from casing.
- USB Power multi-charger
In my experience Anker provide the best solution. Here's a 60W version with 6 outputs.
- High quality charging cables
I recommend Anker cables, do not go cheap on these because I have and they often fail. When cheap cables fail they result in the Raspberry Pi inexplicably restarting.
- Ethernet cables
You'll need Ethernet cables. You can use any CAT5/5e or compatible cables from eBay, Amazon or an electronics supplier. I've had luck with flat ribbon cables which are more flexible.
If cables are too short and tight they can pull your stack of Raspberry Pis over.
Prepare Raspbian
Flash Raspbian Stretch Lite to an SD card. You can make do with 8GB but 16GB is recommended.
Update: I previously recommended downloading Raspbian Jessie instead of Stretch. At time of writing (3 Jan 2018) Stretch is now fully compatible.
I recommend using Etcher.io to flash the image.
Before booting the RPi you'll need to create a file in the boot partition called "ssh". Just keep the file blank. This enables remote logins.
- Power up and change the hostname
Now power up the RPi and connect with ssh
$ ssh pi@raspberrypi.local
The password is
raspberry.
Use the raspi-config utility to change the hostname to swarm-1 or similar and then reboot.
While you're here you can also change the memory split between the GPU (graphics) and the system to 16mb.
- Now install Docker
We can use a utility script for this:
$ curl -sSL https://get.docker.com | sh
This installation method may change in the future.
You may see a warning like this, but you can ignore it and you should end up with Docker CE 17.05 or newer:
WARNING: raspbian is no longer updated @ https://get.docker.com/
Installing the legacy docker-engine package...
After, make sure your user account can access the Docker client with this command:
$ usermod pi -aG docker
If your username isn't
pithen replacepiwithalexfor instance.
- Change the default password
Type in $sudo passwd pi and enter a new password, please don't skip this step!
- Repeat
Now repeat the above for each of the RPis.
Create your Swarm cluster
Log into the first RPi and type in the following:
$ docker swarm init
Swarm initialized: current node (3ra7i5ldijsffjnmubmsfh767) is now a manager.

To add a worker to this swarm, run the following command:

    docker swarm join \
    --token SWMTKN-1-496mv9itb7584pzcddzj4zvzzfltgud8k75rvujopw15n3ehzu-af445b08359golnzhncbdj9o3 \
    192.168.0.79:2377
You'll see the output with your join token and the command to type into the other RPis. So log into each one with ssh and paste in the command.
Give this a few seconds to connect then on the first RPi check all your nodes are listed:
$ docker node ls
ID                            HOSTNAME            STATUS              AVAILABILITY        MANAGER STATUS
3ra7i5ldijsffjnmubmsfh767 *   swarm1              Ready               Active              Leader
k9mom28s2kqxocfq1fo6ywu63     swarm3              Ready               Active
y2p089bs174vmrlx30gc77h4o     swarm4              Ready               Active
Congratulations! You have a Raspberry Pi cluster!
*More on clusters
You can see my three hosts up and running. Only one is a manager at this point. If our manager were to go down then we'd be in an unrecoverable situation. The way around this is to add redundancy by promoting more of the nodes to managers - they will still run workloads, unless you specifically set up your services to only be placed on workers.
To upgrade a worker to a manager, just type in docker node promote <node_name> from one of your managers.
Note: Swarm commands such as
docker service lsordocker node lscan only be done on the manager.
For a deeper dive into how managers and workers keep "quorum" head over to the Docker Swarm admin guide.
OpenFaaS
Now let's move on to deploying a real application to enable Serverless functions to run on our cluster. OpenFaaS is a framework for Docker that lets any process or container become a serverless function - at scale and on any hardware or cloud. Thanks to Docker and Golang's portability it also runs very well on a Raspberry Pi.

Please show your support and star the OpenFaaS repository on GitHub.
Log into the first RPi (where we ran docker swarm init) and clone/deploy the project:
$ git clone https://github.com/alexellis/faas/
$ cd faas
$ ./deploy_stack.sh
Creating network func_functions
Creating service func_gateway
Creating service func_prometheus
Creating service func_alertmanager
Creating service func_nodeinfo
Creating service func_markdown
Creating service func_wordcount
Creating service func_echoit
Update: OpenFaaS on Raspberry Pi with Swarm now ships with authentication turned on by default. Look out for the command that shows you how to run faas-cli login and note down your password for later.
Your other RPis will now be instructed by Docker Swarm to start pulling the Docker images from the internet and extracting them to the SD card. The work will be spread across all the RPis so that none of them are overworked.
This could take a couple of minutes, so you can check when it's done by typing in:
$ watch 'docker service ls'
ID                  NAME                MODE                REPLICAS            IMAGE                                   PORTS
57ine9c10xhp        func_wordcount      replicated          1/1                 functions/alpine:latest-armhf
d979zipx1gld        func_prometheus     replicated          1/1                 alexellis2/prometheus-armhf:1.5.2       *:9090->9090/tcp
f9yvm0dddn47        func_echoit         replicated          1/1                 functions/alpine:latest-armhf
lhbk1fc2lobq        func_markdown       replicated          1/1                 functions/markdownrender:latest-armhf
pj814yluzyyo        func_alertmanager   replicated          1/1                 alexellis2/alertmanager-armhf:0.5.1     *:9093->9093/tcp
q4bet4xs10pk        func_gateway        replicated          1/1                 functions/gateway-armhf:0.6.0           *:8080->8080/tcp
v9vsvx73pszz        func_nodeinfo       replicated          1/1                 functions/nodeinfo:latest-armhf
We want to see 1/1 listed on all of our services.
Given any service name you can type in the following to see which RPi it was scheduled to:
$ docker service ps func_markdown
ID                  IMAGE                                   NODE    STATE
func_markdown.1     functions/markdownrender:latest-armhf   swarm4  Running
The state should be Running - if it says Pending then the image could still be on its way down from the internet.
At that point, find the IP address of your RPi and open that in a web-browser on port 8080:
$ ifconfig
For example if your IP was: 192.168.0.100 - then go to http://192.168.0.100:8080
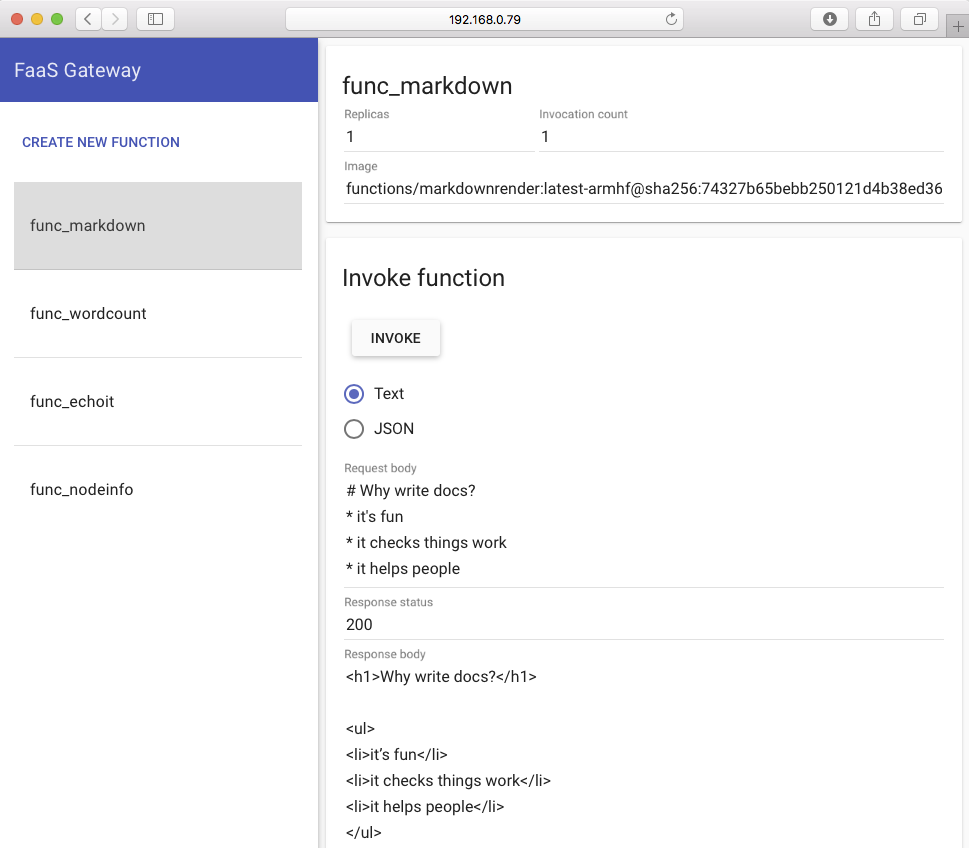
At this point you should see the FaaS UI also called the API Gateway. This is where you can define, test and invoke your functions.
Click on the Markdown conversion function called func_markdown and type in some Markdown (this is what Wikipedia uses to write its content).
Then hit invoke. You'll see the invocation count go up and the bottom half of the screen shows the result of your function:
Deploy your first serverless function:
There is already a tutorial written for this section, but we'll need to get the RPi set up with a couple of custom steps first.
- Get the FaaS-CLI
$ curl -sSL cli.openfaas.com | sudo sh
armv7l
Getting package https://github.com/alexellis/faas-cli/releases/download/0.4.5-b/faas-cli-armhf
- Use the arm templates
Note: when you create a function in Node or Python you need to add a suffix of
-armhfto use a special Docker image for the Raspberry Pi
Here's an example:
$ faas-cli new --lang python-armhf python-hello
$ faas-cli new --lang node-armhf python-hello
Now you can follow the same tutorial written for PC, Laptop and Cloud available below, but we are going to run a couple of commands first for the Raspberry Pi.
Pick it up at step 3:
-
Instead of placing your functions in
~/functions/hello-python- place them inside thefaas-clifolder we just cloned from GitHub. -
Also replace "localhost" for the IP address of your first RPi in the
stack.ymlfile.
Note that the Raspberry Pi may take a few minutes to download your serverless function to the relevant RPi. You can check on your services to make sure you have 1/1 replicas showing up with this command:
$ watch 'docker service ls'
pv27thj5lftz        hello-python        replicated          1/1                 alexellis2/faas-hello-python-armhf:latest
Continue the tutorial: Your first serverless Python function with OpenFaaS
Update: we've given the CLI an overhaul, it can now:
list,invokeand createnewfunctions from templates. Check it out here: Coffee with the FaaS-CLI
For more information on working with Node.js or other languages head over to the main OpenFaaS repo.
Get up to speed on Docker on the Raspberry Pi - read: 5 Things you need to know
Check your function metrics
With a Serverless experience, you don't want to spend all your time managing your functions. Fortunately Prometheus metrics are built into OpenFaaS meaning you can keep track of how long each functions takes to run and how often it's being called.
Metrics drive auto-scaling
If you generate enough load on any of of the functions then OpenFaaS will auto-scale your function and when the demand eases off you'll get back to a single replica again.
Here is a sample query you can paste into Safari, Chrome etc:
Just change the IP address to your own.
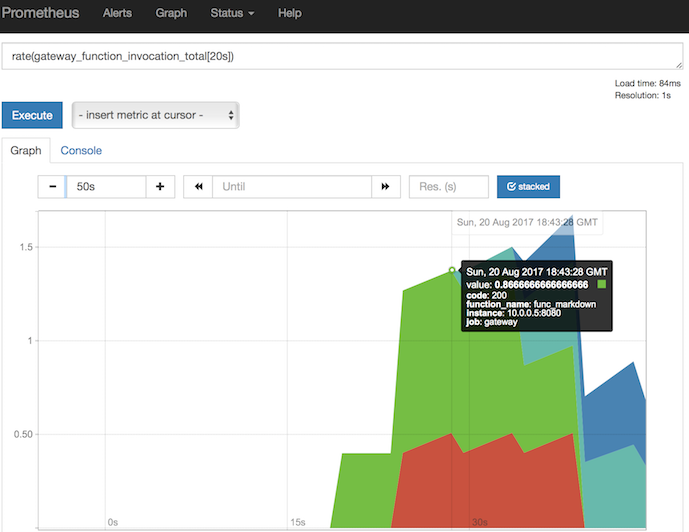
http://192.168.0.25:9090/graph?g0.range_input=15m&g0.stacked=1&g0.expr=rate(gateway_function_invocation_total%5B20s%5D)&g0.tab=0&g1.range_input=1h&g1.expr=gateway_service_count&g1.tab=0
The queries are written in PromQL - Prometheus query language. The first one shows us how often the function is being called:
rate(gateway_function_invocation_total[20s])
The second query shows us how many replicas we have of each function, there should be only one of each at the start:
gateway_service_count
If you want to trigger auto-scaling you could try the following on the RPi:
$ while [ true ]; do curl -4 localhost:8080/function/func_echoit --data "hello world" ; done
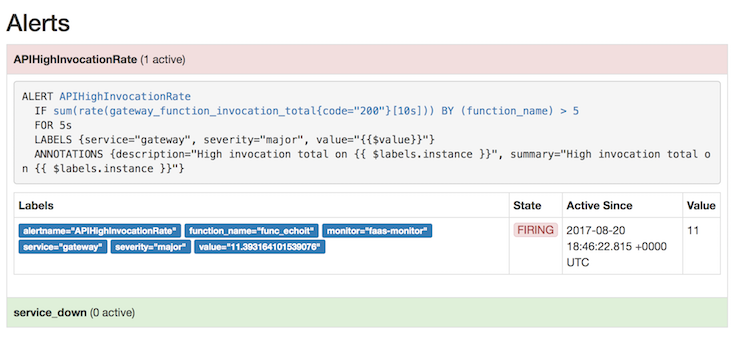
Check the Prometheus "alerts" page, and see if you are generating enough load for the auto-scaling to trigger, if you're not then run the command in a few additional Terminal windows too.
After you reduce the load, the replica count shown in your second graph and the gateway_service_count metric will go back to 1 again.
Wrapping up
We've now set up Docker, Swarm and run OpenFaaS - which let us treat our Raspberry Pi like one giant computer - ready to crunch through code.
Please show support for the project and Star the FaaS GitHub repository
How did you find setting up your Docker Swarm first cluster and running OpenFaaS? Please share a picture or a Tweet on Twitter @alexellisuk
Watch my Dockercon video of OpenFaaS
I presented OpenFaaS (then called FaaS) at Dockercon in Austin - watch this video for a high-level introduction and some really interactive demos Alexa and GitHub.
Got questions? Ask in the comments below - or send your email over to me for an invite to my Raspberry Pi, Docker and Serverless Slack channel where you can chat with like-minded people about what you're working on.Want to learn more about Docker on the Raspberry Pi?
I'd suggest starting with 5 Things you need to know which covers things like security and and the subtle differences between containers on a regular PC and an RPi.
Share on Twitter
Build Your Serverless Raspberry Pi cluster with @Docker! @Raspberry_Pi #devops #cluster @open_faas https://t.co/VdlJAImcSv pic.twitter.com/hj4waAbwnn
— Alex Ellis (@alexellisuk) August 21, 2017