Learn Kubernetes behind a corporate proxy
This post is a quick guide to running minikube which installs a single-node Kubernetes cluster on a Mac. In this guide we will configure our minikube installation behind a corporate HTTP proxy and then kick the tires with a sample microservice.
Get minikube
The preferred mechanism for installing minikube is via brew, but brew may also try to install a conflicting version of Docker on your Mac. Therefore use curl to download the binary from https://github.com/kubernetes/minikube/releases:
$ curl -Lo minikube https://storage.googleapis.com/minikube/releases/v0.20.0/minikube-darwin-amd64 && chmod +x minikube && sudo mv minikube /usr/local/bin/
You'll also need kubectl the client application for controlling a cluster:
curl -Lo kubectl https://storage.googleapis.com/kubernetes-release/release/v1.6.4/bin/darwin/amd64/kubectl && chmod +x kubectl && sudo mv kubectl /usr/local/bin/
Configure your proxy
If you can only access the Internet through a filtering HTTP proxy, then the chances are you also need to authenticate to it. If you have to use NTLM (Active Directory) then you need to setup a client application on your Mac to authenticate on your behalf.
- Install
cntlm
cNTLM is an open-source C application which can communicate with an LDAP / NTLM authenticating proxy. You store a hash of your password and then use the local instance of cNTLM for all your web requests.
There is a brew formula for installing cntlm.
$ brew install cntlm
- Configure brew
Brew must be configured with your corporate proxy IP address, which ports and interfaces you want to bind it to and a hash of your password.
Edit the config file stored at /usr/local/etc/cntlm.conf
Update the Proxy, Username and Domain - then generate your hash:
$ cntlm -M https://google.com
Copy the output from the hash generator into your cntlm.conf file and start the daemon.
Once you have cntlm installed and configured against your Mac's IP address you can start minikube.
Get recursive: you can actually run cNTLM within a Docker container. There are pros and cons to this - it adds complexity but also allows you to have a tighter-gained control over who can access your proxy account.
Start the cluster
Let's imagine our Mac had the DNS entry of mac-101.corp.com with cntlm running on port 3218 on the ethernet adapter.
Start the cluster
$ minikube start --vm-driver=xhyve --docker-env http_proxy=http://mac-101.corp.com:3128 --docker-env https_proxy=http://mac-101.corp.com:3128 --docker-env no_proxy=192.168.99.0/24
You should see the ISO for Kubernetes 1.6.4 being downloaded:
Starting local Kubernetes v1.6.4 cluster...
Starting VM...
Downloading Minikube ISO
 90.95 MB / 90.95 MB [==============================================] 100.00% 0s
Moving files into cluster...
Setting up certs...
Starting cluster components...
Connecting to cluster...
Setting up kubeconfig...
Kubectl is now configured to use the cluster.
The --vm-driver flag is set to use xhyve - a light-weight hypervisor for running VMs on your Mac. If this doesn't work, then drop the flag and VirtualBox will be used instead. If you don't already have VirtualBox you can install it here.
Useful commands:
minikube ssh- if you want to check that everything worked then you can shell into theminikubevm.minikube stop- you should shut down the cluster before shutting down your Macminikube status- gives key status informationminikube ip- gives the IP address of your cluster
In order to control your cluster with kubectl you will have to setup a no_proxy whitelist:
$ export no_proxy=$no_proxy,$(minikube ip)
Kick the tires
You should see no pods running yet:
$ kubectl get pods
No resources found.
The system namespace will have at least three pods executing - Kubernetes separates these from our applications.
$ kubectl get pods --namespace kube-system
NAME                          READY     STATUS    RESTARTS   AGE
kube-addon-manager-minikube   1/1       Running   2          16m
kube-dns-1301475494-6clg9     3/3       Running   3          16m
kubernetes-dashboard-qdwwg    1/1       Running   1          16m
- Deploy a pod
The true test of whether the proxy worked is whether we can pull an image down from the Docker Hub and run it as a deployment. We'll use a container from my serverless project Functions as a Service (functions/nodeinfo) which gives a Node's system info over HTTP.
$ kubectl run --image=functions/nodeinfo:latest --port 8080 nodeinfo
deployment "nodeinfo" created
You can view the NodeInfo source code here.
- Check on the deployment
Since we're behind a proxy, the connection may also be slower than normal. We can check on the deployment with the following command. When AVAILABLE shows 1 then the Pod is ready for requests.
$ kubectl get deployment
NAME       DESIRED   CURRENT   UP-TO-DATE   AVAILABLE   AGE
nodeinfo   1         1         1            0           9s
- Expose the deployment
We can now expose the deployment and it will get a static IP for use within the cluster:
$ kubectl expose deployment/nodeinfo
service "nodeinfo" exposed
You can find the internal IP of the service with the following command:
$ kubectl get service
NAME         CLUSTER-IP   EXTERNAL-IP   PORT(S)    AGE
kubernetes   10.0.0.1     <none>        443/TCP    25m
nodeinfo     10.0.0.165   <none>        8080/TCP   1m
Next - use minikube's ssh functionality to ping the service:
$ minikube ssh 'http_proxy="" curl 10.0.0.165:8080 -X POST --silent --data-binary verbose'
Hostname: nodeinfo-3863679816-fzj3r

Platform: linux
Arch: x64
CPU count: 2
Uptime: 1637
[ { model: 'Intel(R) Core(TM) i5-5287U CPU @ 2.90GHz',
    speed: 2899,
    times: { user: 519300, nice: 2000, sys: 345600, idle: 14745500, irq: 0 } },
  { model: 'Intel(R) Core(TM) i5-5287U CPU @ 2.90GHz',
    speed: 2899,
    times: { user: 510600, nice: 1400, sys: 419200, idle: 14734300, irq: 0 } } ]
If you want to scale the deployment then you will see a unique Hostname of each pod when you use curl to invoke the function.
$ kubectl scale deployment/nodeinfo --replicas=2
deployment "nodeinfo" scaled
We now have two replicas of the nodeinfo pod - here's the first showing up:
$ minikube ssh 'http_proxy="" curl 10.0.0.165:8080 -X POST --silent --data-binary ""'|grep Hostname
Hostname: nodeinfo-3863679816-fzj3r
And here is the second pod showing itself:
$ minikube ssh 'http_proxy="" curl 10.0.0.165:8080 -X POST --silent --data-binary ""'|grep Hostname
Hostname: nodeinfo-3863679816-zpr3r
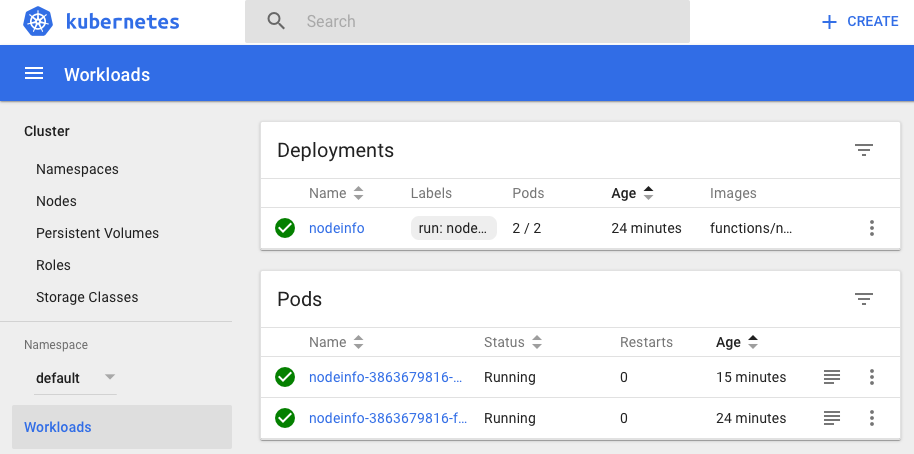
- Launch the Dashboard
The Kubernetes Dashboard provides a UI to manage your cluster. You can launch it with this utility function:
$ minikube dashboard
This will launch a web-browser and navigate to a private IP such as http://192.168.64.4:30000.
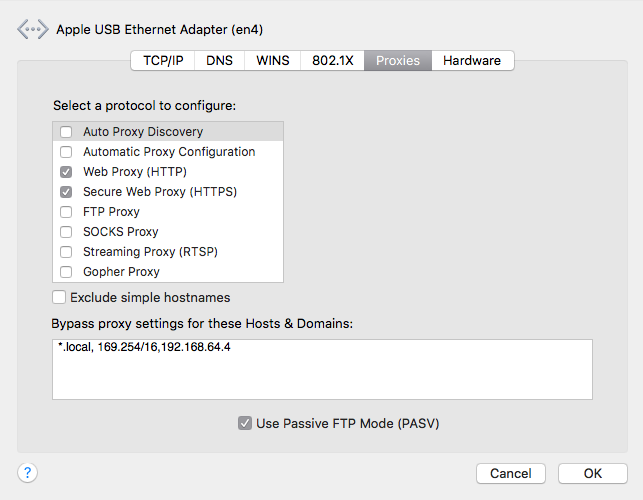
Note: If the Dashboard doesn't show up correctly then head over to your Proxy settings for the Mac and add an exception there.
When you're ready to clean things up just type in minikube stop or minikube delete.
Moving forward
Once you've bootstrapped your proxy configuration into your minikube cluster then you can follow the official Kubernetes guides and tutorials.
If you have access to a lab with Internet access or want to learn at home - then head over to my tutorial for Ubuntu:
Find out more about Functions as a Service (FaaS) and how you can build and deploy functions with your existing Docker toolchain.
Enjoyed the tutorial? 🤓💻
Follow me on Twitter @alexellisuk to keep up to date with new content. Feel free to reach out if you have any questions, comments, suggestions.
Hire me to help you with Kubernetes / Cloud Native
Hire me via OpenFaaS Ltd by emailing sales@openfaas.com, or through my work calendar.
Troubleshooting
- VPN / Clashing IPs
Here is a tip from Ed Robinson who kindly proof-read this blog post.
If you run into issues with clashing IP ranges you can edit the minikube configuration at .minikube/machines/minikube/config.json and update IPAddress and HostOnlyCIDR to something which doesn't clash with your corporate network or VPN. Related Github issue.