Create a hardened Raspberry Pi NAS
In this tutorial we'll convert a stock Raspbian Lite OS into a NAS with two 314GB WDLabs PiDrives in a RAID-1 array. We'll then look at whether that improves performance for I/O intensive tasks such as pulling a Docker image down from the public registry.
The primary aim of the Raspberry Pi Foundation is to educate - this tutorial is designed to cover the basics of setting up a NAS as an educational exercise.
Don't build a NAS with your Pi
First off, why create a Raspberry Pi NAS? I expect there will be some people who could go into great depth about how the Pi is not a suitable platform for a network-attached storage device. Here's a few weak points:
- poor I/O - no SATA, limited USB bandwidth
- slow networking
- lack of ECC RAM
- not suitable for ZFS
- unreliable SD card for booting
#Haters gonna hate

I'd tend to agree with all of those points, but the Pi is a place that can enable us to learn and build DevOps muscle-memory.
A Raspberry Pi is a fully functioning networked system that can run Linux and provides a great opportunity to learn.
Do build a NAS with your Pi
Here's some plus points:
- Cheap to run 24/7 due to low power requirements
- Portable, can even run from battery packs
- Easy to set up using all the grown-up tools that would accompany a consumer or production-grade NAS
- Builds muscle memory for DevOps
- Lets you hone in your technical and networking skills for $5-25.
Requirements
- Use stock Raspbian OS
Using the standard OS over a custom "image" provided by a website you know nothing about means you get more control over updates and that there are no surprises or undocumented customizations you need to make yourself aware of.
-
Use software RAID-1 with two hard drives for redundancy
-
Reconfigure Docker to store its data on the RAID array
This will give a performance boost and move write operations away from your system SD card.
-
Provide at least one service for network storage.
-
Samba (Windows-style) file sharing - low performance, but easy for Windows clients
-
FTP - unencrypted, but high performance
-
SSH/SFTP/SCP - secured and built into almost any Linux/UNIX-based system
-
NFS - unencrypted but gives higher level of performance than Samba between Linux/UNIX hosts. Can be mounted over the network to appear as a local directory
-
Enable backups
-
rsync
Backup software will not be covered in detail but we'll look at how rsync can run over NFS or SSH to perform an efficient differential backup.
Disclaimer: we're working with system tools here and there is always a risk you could lose data so make sure you have backups. Ideally you should use a fresh hard disk and SD card.
Pick up a new Raspberry Pi 4
At time of writing, the RPi4 with 4GB RAM is the best option for building and running Docker images. It is also well suited to running Kubernetes using k3s and k3sup
Contents
1. Materials
- 2x Western Digital's 314GB PiDrive or equivalent
- 3x 5v Power adapters of at least 2A each
- 1x Pi 2 or Pi 3
- 1x SD card
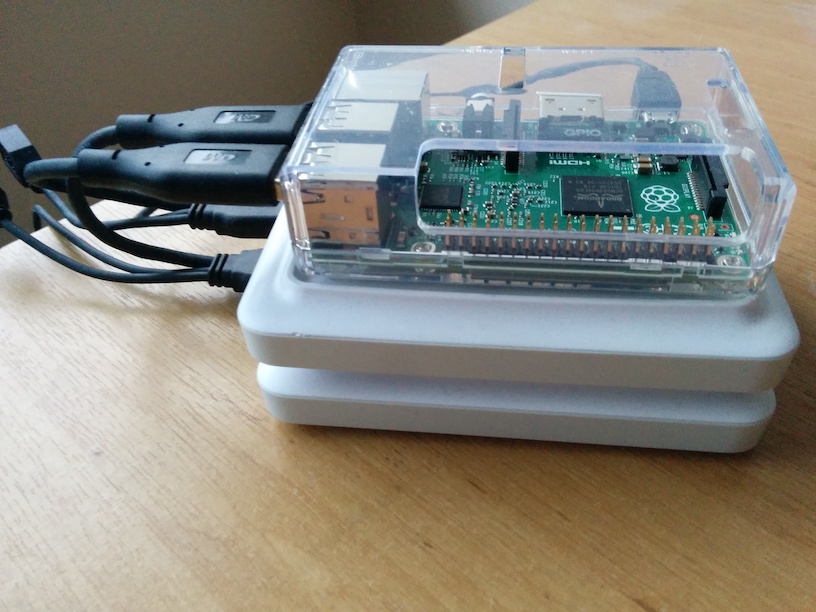
For the build we will be using two Western Digital Pi Drives - these are available in 314GB and 1TB. 314GB is a reference to the number "Pi".
Each drive will be driven from its own USB power supply using "Y" cables provided in the Western Digital kit. The third power supply should be plugged into the Pi itself.
It is worth using an official 2.4A Pi Power adapter
2. Hardening the Pi
The first step to creating your NAS is to harden and customize the installation.
2.1 Add new user
Add a brand-new user to the system and delete the built-in pi user. We don't even want to risk leaving the default user in-tact.
# sudo useradd alex -s /bin/bash -m -G adm,sudo
# sudo passwd alex
Enter new UNIX password:
Retype new UNIX password:
passwd: password updated successfully
We picked the sudo group because that allows our new user to elevate super-user permissions. They will still be prompted for a password every time they elevate though. Here's the line in /etc/sudoers which controls that behavior:
# Allow members of group sudo to execute any command
%sudo	ALL=(ALL:ALL) ALL
If you need to run commands on your Pi ssh non-interactively which need sudo access then you should change the line below. This is so your new user isn't prompted for a password from the sudo command. Your script would have no way to provide it.
# Allow members of group sudo to execute any command
%sudo	ALL=(ALL) NOPASSWD: ALL
This configuration mirrors the official Ubuntu 16.x cloud-provisioned images (cloudinit) which do not require a password for
sudoaccess.
Try to make do without this change invoking the rule of least privilege.
Finally set a password for your new user, log out and log back in as the new user. Remove the pi user:
# sudo userdel pi
# sudo rm -rf /home/pi
2.2 Optimize GPU memory-split
This line will optimize the split of memory between the graphics system and the rest of your Pi. A reboot is required but check the output of free -h before and after. You will see the total RAM available go up.
# free -h
             total       used       free
Mem:          925M        72M       853M
-/+ buffers/cache:        30M       895M
Swap:          99M         0B        99M
The minimum amount of RAM we can reserve for the GPU is 16MB. You can only run this command once, after that if you want to change the value edit the /boot/config.txt file with nano.
# echo "gpu_mem=16" | sudo tee -a /boot/config.txt
2.3 Change hostname
You should change the hostname of your NAS either manually or with the raspi-config utility.
To edit the hostname manually use the nano editor to edit /etc/hosts and /etc/hostname then reboot. Find the text raspberrypi and change it to whatever you want.
You will be able to discover the Raspberry Pi using its hostname from a Mac. You can also discover it from a Windows machine if you have iTunes installed. This is much easier than trying to remember different IP addresses.
The avahi-daemon runs as a systemd service and will allow you to discover the Pi using its hostname
You can check the status of the daemon like this:
$ sudo systemctl status avahi-daemon

● avahi-daemon.service - Avahi mDNS/DNS-SD Stack
   Loaded: loaded (/lib/systemd/system/avahi-daemon.service; enabled)
   Active: active (running) since Sat 2016-12-03 15:48:50 UTC; 22min ago
 Main PID: 391 (avahi-daemon)
   Status: "avahi-daemon 0.6.31 starting up."
   CGroup: /system.slice/avahi-daemon.service
2.4 Configure a static IP address
You will have an IP address issued via DHCP from your home router. It's a good idea to set this to a permanent number. Pick a high number so that it won't get allocated to another device on your network.
If you want to double check that nobody has that IP then type in
ping -c 1 192.168.0.240
Add these lines to /etc/dhcpcd.conf first checking if your home router assigns the 192.168.0.0/24 or 192.168.1.0/24 range.
interface eth0
static ip_address=192.168.0.240/24
static routers=192.168.0.1
static domain_name_servers=8.8.8.8
Reboot your Pi. The DNS entry here corresponds to Google's primary server.
2.5 Disallow password logins over SSH
Given enough time or a weak enough password a brute-force attacker with access to your Pi could gain entry to your Pi. That barrier can be made effectively much higher by disallowing SSH to accept password logins.
First generate an ssh-key on your PC or laptop if you don't already have one.
Run ssh-keygen and answer yes to any questions - this will create a private/public key-pair in your home directory.
Now copy the public key over to the Pi with the ssh-copy-id utility:
Number of key(s) added:        1

Now try logging into the machine, with:   "ssh 'alex@naspi.local'"
and check to make sure that only the key(s) you wanted were added.
A side-effect here is that we will not need to enter our password when connecting to the Pi over SSH. Do not lose your ssh-keys which were generated in ~/.ssh/ and keep them private.
Now let's disable password login over SSH so that the risk of brute-force dictionary attacks is reduced.
Add PasswordAuthentication no to your SSHD config file:
echo "PasswordAuthentication no" | sudo tee -a /etc/ssh/sshd_config
Reboot your system and check that you can still access the Pi remotely.
2.6 Do not open your NAS to the Internet

The Internet is not what it was in 1969 - I would not recommend opening any ports on your NAS to the Internet. If you insist and know the risks then check out port forwarding or NAT on your ISP's router admin page.
If you expose SSH to the world on port 22, you can expect someone to find your Pi and start a brute force attack. Even if they cannot get in this is a drain on your system logs and CPU resources.
To check your system logs for SSH type in:
# sudo journalctl _COMM=sshd --since=today
To check your Docker daemon logs type in the same replacing sshd with dockerd
3.0 The RAID array
Now connect your drives to their power supplies and plug them in via USB. You should see an extremely bright blue LED light up and hear a whirring.
If you hear laboring then the power supply may not be providing enough power for the drive. Try another one.
3.1 Identify the drives
Check the drives through the lsblk command:
lsblk
NAME        MAJ:MIN RM   SIZE RO TYPE MOUNTPOINT
sda           8:0    0 292.5G  0 disk
└─sda1        8:1    0 292.5G  0 part
sdb           8:16   0 292.5G  0 disk
└─sdb1        8:17   0 292.5G  0 part
mmcblk0     179:0    0  14.9G  0 disk
├─mmcblk0p1 179:1    0    63M  0 part /boot
└─mmcblk0p2 179:2    0  14.8G  0 part /
Conveniently our two drives got the names sda and sdb with the SD card taking the usual name of mmcblk0.
Note on persistent devices names
If you have additional USB drives plugged in then they may get similar sdx names, be careful to get the right disk.
3.2 Create the partitions
You can now create partitions on the drives. I find fdisk to be the easiest tool to use. Follow all the defaults for both drives.
# sudo fdisk /dev/sda

Welcome to fdisk (util-linux 2.25.2).
Changes will remain in memory only, until you decide to write them.
Be careful before using the write command.

Command (m for help): o
Created a new DOS disklabel with disk identifier 0x6624690f.

Command (m for help): n
Partition type
   p   primary (0 primary, 0 extended, 4 free)
   e   extended (container for logical partitions)
Select (default p):

Using default response p.
Partition number (1-4, default 1):
First sector (2048-613355519, default 2048):
Last sector, +sectors or +size{K,M,G,T,P} (2048-613355519, default 613355519):

Created a new partition 1 of type 'Linux' and of size 292.5 GiB.

Command (m for help): w
The partition table has been altered.
Calling ioctl() to re-read partition table.
Syncing disks.
3.3 Install toolchain
We will use the standard tool mdadm to create our RAID-1 array in software.
sudo apt-get update && sudo apt-get -qy install mdadm
After the installation a blue screen will appear in the Terminal. Answer yes to all questions.
3.4 RAID 0, 1 or 5
The primary difference between RAID-0 and RAID-1 is that RAID-0 gives you a combined storage area of 2x314GB (628GB) but no redundancy, if one drive fails you will lose all your data. In theory disk reads/writes can improve performance but during testing the Pi performed poorly with both configurations.
RAID-1 makes only 314GB of storage available but every file you write is written back to both disks slowing things down but increasing the level the tolerance for failure. One drive can fail.
RAID-5 is not recommended for the Pi - during testing it choked the whole system while performing writes. RAID-5 will stripe/spread data across all three drives but still only provide a proportion of the total capacity. It is generally more tolerant of disk failure at the cost of performance.
So let's create the RAID-1 array:
# sudo mdadm --create --verbose /dev/md0 --level=mirror --raid-devices=2 /dev/sda1 /dev/sdb1
Now format your /dev/md0 device and mount it:
# sudo mkdir -p /mnt/raid1
# sudo mkfs.ext4 /dev/md0
# sudo mount /dev/md0 /mnt/raid1/

# ls -l /mnt/raid1/
total 16
drwx------ 2 root root 16384 Dec  3 16:40 lost+found
3.5 Make the drive permanent with fstab
Edit your fstab file which contains a list of all drives and partitions to be mounted on boot-up.
echo "/dev/md0 /mnt/raid1/ ext4 defaults,noatime 0 1" | sudo tee -a /etc/fstab
Before rebooting run the following to update your /etc/mdadm/mdadm.conf file
sudo mdadm --detail --scan | sudo tee -a /etc/mdadm/mdadm.conf
4.0 Docker
We can install Docker on the Pi with a single script, we'll then set it to use the RAID-1 array for its storage. If you have extra time to learn Docker then it can help harden your NAS services.
It also makes it easy to create repeatable environments or to run multiple copies of the same software on different ports such as the NGinx web server or a Ghost blog.
The technology experts at Gartner Inc have been quoted as saying container-based apps are "more secure" than on a bare OS.
4.1 Install Docker
# curl -sSL get.docker.com | sh
This one-liner installation method will also work on Ubuntu for your PC or in the cloud. Consult Docker.com for installation methods for other Linux distributions.
Grant your user to access the Docker daemon through the CLI. If you don't do this every docker command will need to be prefixed with sudo:
# sudo usermod -aG docker alex
Now let's edit the Docker systemd unit file so that it uses the RAID array. The key setting is -g /mnt/raid1/ which tells Docker to use this location for its "graph".
Edit: /etc/systemd/system/docker.service.d/overlay.conf:
[Service]
ExecStart=
ExecStart=/usr/bin/dockerd -g /mnt/raid1/ --storage-driver overlay -H fd://'
Perform a reboot.
4.2 Hardening with Seccomp profiles, AppArmor or SELinux (advanced)
You may chose to run some or all of your system services through Docker containers. This gives you an isolated, repeatable environment.
If you're an advanced user, then you can harden system services by running them in restricted Seccomp profiles with the --security-opt parameter passed into docker run. Read more on the Docker blog:
5.0 Benchmarks
5.1 Docker Hub
Now let's try pulling an ARM Docker image to run on the Raspberry Pi.
# time docker pull alexellis2/nginx-arm:v6
v6: Pulling from alexellis2/nginx-arm
fad9d6c66346: Pull complete
a537149e060b: Pull complete
9cf178efbebc: Pull complete
a3ed95caeb02: Pull complete
2e002288bac5: Pull complete
d90fa0c5b677: Pull complete
6b7ee730c946: Pull complete
Digest: sha256:c308aa262f87ff15ebd0317257890f455affbd26b3e2c904182f8d9858207b29
Status: Downloaded newer image for alexellis2/nginx-arm:v6

real	2m33.430s
user	0m0.520s
sys	0m0.550s
The slowest part of pulling Docker images appears to be extracting each layer of the image. These images are verified with a SHA256 hashsum and compressed into tarballs. It would seem that the Pi takes significantly longer, but once pulled down starting/stopping containers is very quick.
With class 10 SD card: 2m33 With RAID1 array: 1m55
# time sudo docker rmi -f alexellis2/nginx-arm:v6

Untagged: alexellis2/nginx-arm:v6
real	0m15.320s
user	0m0.110s
sys	0m0.130s
5.2 Run a Docker container
You can now run Nginx (the web-server, caching reverse proxy used by Netflix) on your Pi.
# docker run --name web -p 80:80 --restart=always -d alexellis2/nginx-arm:v6
From a web browser you can connect to http://naspi.local/ where naspi is the hostname of your Pi.
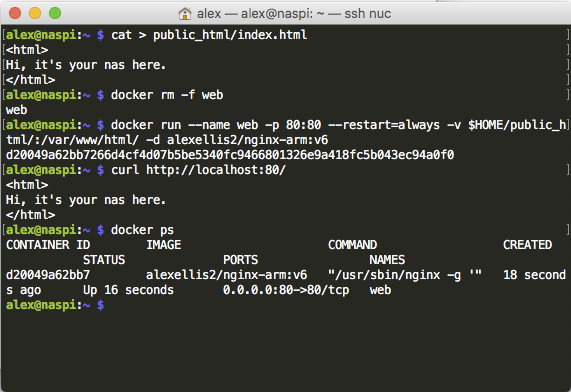
If you want to host your own static HTML website from a folder in your home directory such as (~/public_html/) you can use a Docker bind-mount like this:
# docker rm -f web
# docker run --name web -p 80:80 --restart=always -v $HOME/public_html/:/var/www/html/ -d alexellis2/nginx-arm:v6
Do you want to know more about NGinx?
5.3 SFTP
SFTP is an ideal way to transfer files across your network because the SSH client is built into most Linux/UNIX distributions and Macs and can be added to Windows easily through the putty project or Filezilla etc.
Let's use the Raspbian OS image file which is 1.3GB in size:
# du -h ./2016-09-23-raspbian-jessie-lite.img
1.3G	2016-09-23-raspbian-jessie-lite.img
Create a testing ground and give your user permissions:
# sudo mkdir -p /mnt/raid1/drop/
# sudo chown alex:alex /mnt/raid1/drop/
Now from another machine or Pi initiate a file copy over SFTP/SCP. From my Mac mini to the Pi:
# scp 2016-09-23-raspbian-jessie-lite.img alex@192.168.0.240:/mnt/raid1/drop
I observed a high load on the system going up to a 2.5 sustained.
The transfer with an SD card took 03m28 and 03m14 on the second run with an average of around 6.3MB/s.
SD card: 03m14 HDD: 02m57 (RAID 1) HDD: 02m17 (No RAID)
Going in the other direction (upload from Pi to remote host with SSD) I was able to sustain 6.5MB/s upload speed taking a total of 03:21 minutes.
SD card: 03m09 HDD: 15m08 (RAID 1 system load > 4.6)
A raw copy of the same file with dd from the RAID array to itself took about the same time as the network transfer 7.3 MB/s - 03:09.
# cd /mnt/raid1/drop
# time dd if=./2016-09-23-raspbian-jessie-lite.img of=./2016-09-23-raspbian-jessie-lite.img.1 bs=1M

1325+0 records in
1325+0 records out
1389363200 bytes (1.4 GB) copied, 189.096 s, 7.3 MB/s

real	3m9.173s
user	0m0.000s
sys	0m18.790s
This makes me think that the bandwidth of the Pi's USB bus is the bottleneck here. When we introduce a network transfer we make matters worse because the Pi uses the USB host for its networking.
5.4 NFS
I won't go into detail about how to set up an NFS export, but if you decide this is the appropriate protocol for your home network check out the excellent wiki by the Arch Linux team:
When I used dd to copy the file from my Mac Mini to the Pi over the NFS mount with a buffer of 10MB this took 2m47 and averaged at 8.3 MB/s.
5.5 Backups
Rsync
If you want to sync-up a directory to your NAS you will probably look to rsync initially. This tool is easy to use and can work over the NFS mount or SSH. You can install rsync with apt-get and/or brew for your Mac.
# rsync -av --progress --stats /usr/share/nginx /mnt/remote/hdd/
This copies to remote location via NFS mount
# rsync -av --progress --stats /usr/share/nginx naspi.local:/mnt/hdd/
Syncs to remote location via SSH
-a retains archival properties
-v, --progress --stats for verbose output
-z this option can use compression, which may or may not be optimal on the Pi
To set your NAS up as a time capsule backup endpoint install the
netatalkpackage withapt-getand add a time-machine entry to/etc/afp.conf.
Become an insider
You can become an insider and get insider updates on all of my work with OSS, blogs, links, tweets, videos, events and new features for OpenFaaS. You can become an insider by sponsoring me on GitHub from 5 USD / mo.
Don't miss the next update, sponsor me on GitHub today.
Enjoyed the tutorial? 🤓💻
Follow me on Twitter @alexellisuk to keep up to date with new content. Feel free to reach out if you have any questions, comments, suggestions.
Wrapping up
Create a hardened @Raspberry_Pi NAS to provide storage and host a @docker engine on a RAID array https://t.co/gMfsAtFDrR pic.twitter.com/PZi09baN1Q
— Alex Ellis (@alexellisuk) December 4, 2016
In summary the Raspberry Pi with RAID is probably not the ideal NAS for hosting your most precious data and will take a significant amount of time for both reads and writes. There may be less performance overhead with a straight drive-mount bypassing software RAID completely.
There are some advantages to having a rotary hard disk though: if you want to host a project on your Pi then a hard disk will provide much larger capacity, better tolerance for failure and better redundancy than your SD card.
This does not replace a proper back-up strategy with automation, rotation and off-site copies.
If you want to make your Pi even more reliable you can in theory move the root filesystem to the RAID array - but this involves recompiling your kernel. The Raspberry Pi 3 also has provisional support for booting directory from a hard-disk or network.
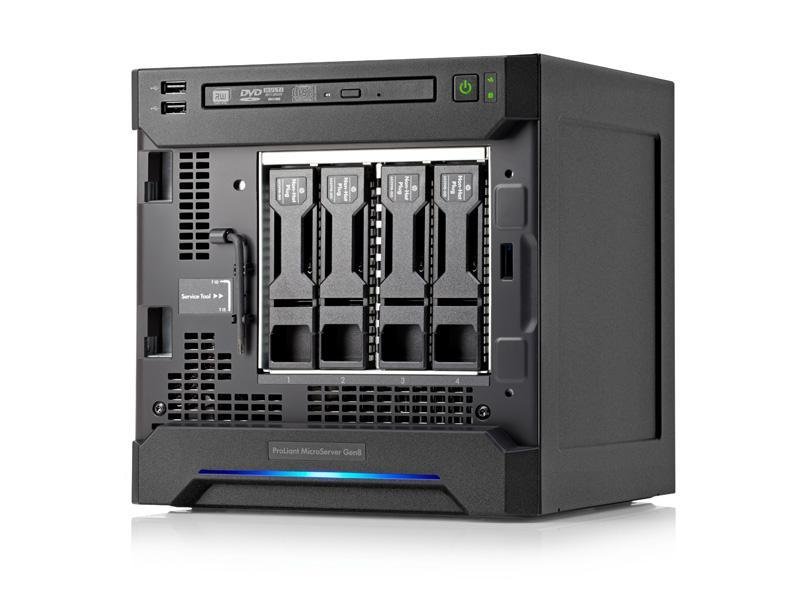
I own a HP Proliant Microserver which is several times more expensive than a Pi, but comes with ECC memory and can host up to 4-5 HDDs. The additional RAM capacity means you can even take advantage of ZFS. It draws far much power than the Raspberry Pi at around 50-60 Watts, even idle - so I don't run it 24/7.
See also:
Read how I host my Ghost blog on a Raspberry Pi Model 3 with Docker volumes for backups and easy upgrades.