Get a public LoadBalancer for your private Kubernetes cluster
In this tutorial, I'll walk through how you can expose a Service of type LoadBalancer in a private Kubernetes cluster.
You'll get a fully working routeable IP for any TCP service on your local or dev cluster through the use of a secure, self-hosted tunnel server which will be provisioned on a public cloud instance.
For the tutorial, we'll be installing the inlets-operator which is a Kubernetes controller that automates everything - from provisioning a cloud instance with inlets Pro preinstalled to then running a Pod inside the cluster with an inlets Pro client.
inlets Pro can be thought of like SSH, but for the cloud - it works as a stand-alone binary, Docker container or Kubernetes Pod to link services between networks. inlets Pro can proxy either TCP or HTTP traffic, and then it's up to you whether you want to use it like a VPN, or like a self-hosted replacement for Ngrok.
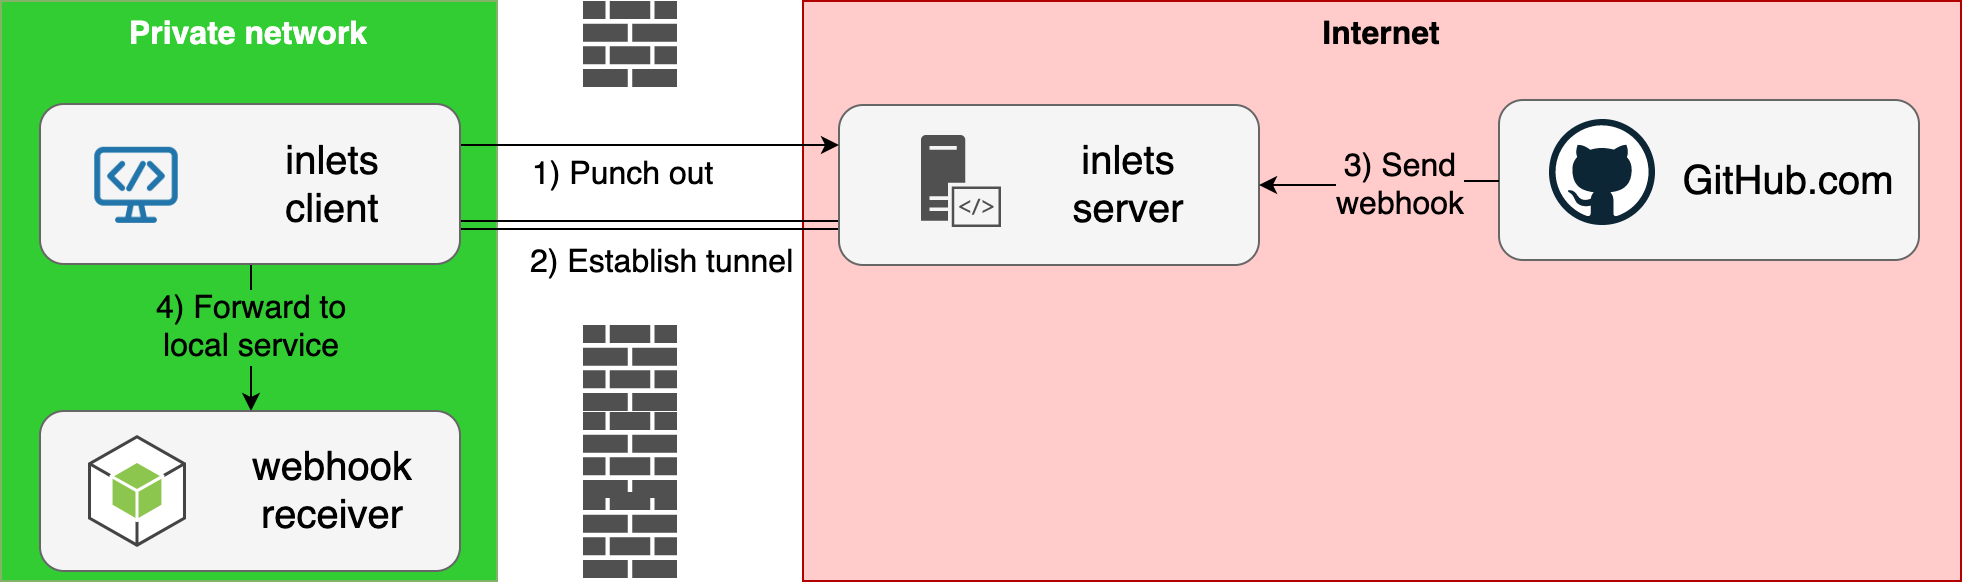 Conceptual diagram showing inlets for receiving webhooks from GitHub
For comparisons to other tools such as Ngrok, MetalLB and for more about the use-cases for incoming network-connectivity, feel free to checkout the GitHub repo and leave a ⭐️ inlets-operator.
If you are looking to expose an Ingress Controller and get TLS certificates then try this tutorial instead: Expose Your IngressController and get TLS from LetsEncrypt
Tutorial
First we'll create a local cluster using K3d or KinD, then create a Deployment for Nginx, expose it as a Service of type LoadBalancer, and then show it being accessed over the Intern.et
Pre-requisites
The operator will use your chosen IaaS platform to create a tunnel server aka (exit-server) for each LoadBalancer service you expose. There are other ways to create exit-servers, but operator's job is to automate them for you using an API key.
You can use a number of different cloud platforms for your exit-server, the first two providers I added were: Equinix Metal (packet) and DigitalOcean.com, but since then many more have been added by the community.
See a complete list here: inlets-operator reference documentation
You will also need to install Docker on your computer since it will be used to run the local Kubernetes cluster.
Windows users should install Git Bash
Option A - Install your local cluster with k3d
k3d installs Rancher's light-weight k3s distribution and runs it in a Docker container. The advantage over KinD is that it seems to be quicker to start and can hold on to your configuration between reboots.
Note: You'll also need Docker installed to use k3d.
- Create a cluster
k3d cluster create \
  --k3s-server-arg "--no-deploy=traefik --disable servicelb"
I'm specifically disabling the service load balancer and Traefik, because these are not required for the purposes of the demo.
Before going any further, switch into the context of the new Kubernetes cluster:
$ k3d kubeconfig merge k3s-default
/home/alex/.k3d/kubeconfig-k3s-default.yaml

$ kubectl config set-context k3d-k3s-default
Context "k3d-k3s-default" modified.
Note: these instructions were tested with
v1.15.4
Option B - Install your local cluster with KinD
KinD has gained popularity within the Kubernetes community since it was featured at KubeCon in 2019.
-
Create a cluster
$ kind create cluster

Creating cluster "kind" ...
 ✓ Ensuring node image (kindest/node:v1.19.1) 🖼
 ✓ Preparing nodes 📦
 ✓ Writing configuration 📜
 ✓ Starting control-plane 🕹️

You can now use your cluster
Before going any further, switch into the context of the new Kubernetes cluster:
$ kubectl config set-context kind-kind
Context "k3d-k3s-default" modified.
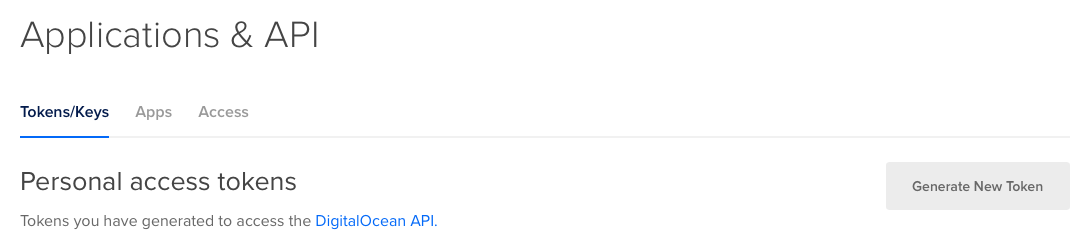
Create a Cloud Access Token
Log into DigitalOcean.com, then click "API" and Generate New Token:
Copy the value from the UI and run the following to store the key as a file, such as $HOME/Downloads/do-access-token
Deploy the inlets-operator into your cluster
You can install the operator using Helm, but there's an easier way using the arkade tool. It still uses the Helm chart, but automates everything and provides helpful CLI flags.
Install arkade, and yes you can use this with any Kubernetes cluster, even k3s or a Raspberry Pi.
# Let sudo move the binary to /usr/local/bin for you
curl -sSL https://get.arkade.dev | sudo sh

# Install without sudo, then move arkade to /usr/local/bin
curl -sSL https://get.arkade.dev | sh
Now find the various options for the inlets-operator app:
arkade install inlets-operator --help
Install the operator and specify the path for the DigitalOcean access token:
arkade install inlets-operator \
 --provider digitalocean \
 --region lon1 \
 --token-file $HOME/Downloads/do-access-token
Your inlets Pro license or trial key will be read from $HOME/.inlets/LICENSE, but you can also override this value with the --license/-file flag.
You can also install the inlets-operator using helm
Create a test deployment
The OpenFaaS helm chart has an option to expose the gateway using a LoadBalancer, so if you installed it in this way, you'd have a handy serviec to test out.
If you're shorter on time, then you can deploy a simple Nginx container instead:
# K8s 1.18 and higher:

kubectl apply -f \
 https://raw.githubusercontent.com/inlets/inlets-operator/master/contrib/nginx-sample-deployment.yaml

# K8s 1.17
kubectl run nginx-1 --image=nginx --port=80 --restart=Always
You'll see the deployment, but the classic problem that we cannot access it from the Internet.
Expose Nginx as a LoadBalancer
Now if you were using a cloud platform such as AWS EKS, GKE or DigitalOcean Kubernetes, you'd have an IP address assigned by their platform. We're using a local KinD cluster so that simply wouldn't work.
Fortunately inlets solves this problem.
kubectl expose deployment nginx-1 \
  --port=80 --type=LoadBalancer
Now we see the familiar "Pending" status, but since we've installed the inlets-operator, a VM will be created on DigitalOcean and a tunnel will be established.
kubectl get svc -w

NAME         TYPE           CLUSTER-IP    EXTERNAL-IP   PORT(S)        AGE
kubernetes   ClusterIP      10.96.0.1     <none>        443/TCP        2m25s
nginx-1      LoadBalancer   10.104.90.5   <pending>     80:32037/TCP   1s
Keep an eye on the "External IP" field for your IP.
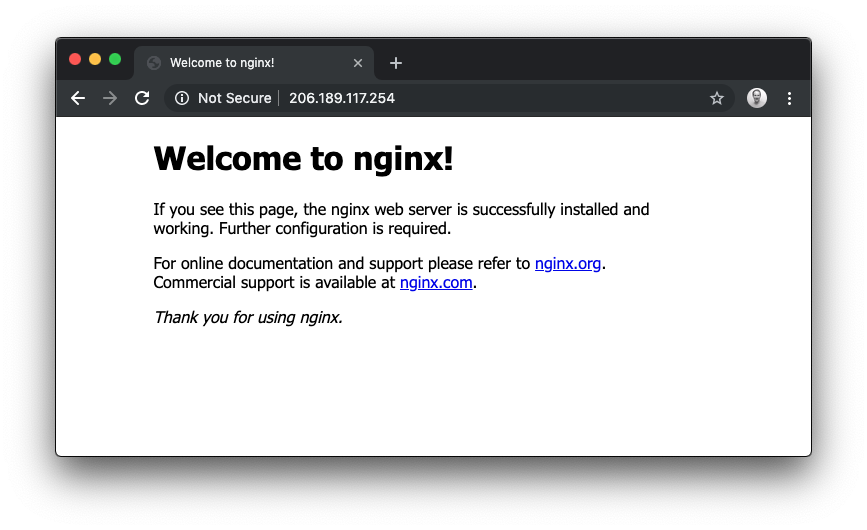
Access your local cluster service from the Internet
Using the IP in "EXTERNAL-IP" you can now access Nginx:
NAME         TYPE           CLUSTER-IP    EXTERNAL-IP   PORT(S)        AGE
kubernetes   ClusterIP      10.96.0.1     <none>        443/TCP        4m34s
nginx-1      LoadBalancer   10.104.90.5   <pending>     80:32037/TCP   2m10s
nginx-1      LoadBalancer   10.104.90.5   206.189.117.254   80:32037/TCP   2m36s
Here you can see the VM that was provisioned:

Now access the site with the IP.
The exit-nodes created by the inlets-operator on DigitalOcean cost around 5 USD per month by using the cheapest VPS available with 1GB of RAM. There may be cheaper options available such as GCP's free tier and Fly.io
If you are running a Kubernetes cluster on the public cloud, you can host as many inlets Pro tunnel servers as you like there by using the helm chart instead of the operator.
Other cloud providers are available such as Equinix Metal (packet), DigitalOcean, Scaleway, AWS EC2, GCP, and Civo.
Management and the CRD
The operator also comes with a CRD or Custom Resource Definition, run the following to view the output:
kubectl get tunnel -o wide
NAME             SERVICE   HOSTSTATUS   HOSTIP          HOSTID      TUNNEL
nginx-1-tunnel   nginx-1   active       178.62.96.156   181822079   nginx-1-tunnel-client
Every LoadBalancer service will receive an IP, unless you apply an annotation to override it, for instance:
kubectl annotate svc/traefik -n kube-system dev.inlets.manage=false
If you'd like to delete your exit-server, then you can do that by logging into your DigitalOcean dashboard, or by removing the service that was exposed for you:
kubectl delete service/nginx-1
The operator will manage the lifecycle of the VMs / cloud hosts on your behalf:
kubectl get tunnel
No resources found in default namespace.

kubectl logs deploy/inlets-operator

2020/02/23 14:35:52 Deleting exit-node for nginx-1: 181822079, ip: 178.62.96.156
Video demo
Short on time? Checkout my video demo and walk-through:
Get a LoadBalancer for your RPi cluster
You can install Kubernetes with k3s using my tutorial
- And a 32GB SD card for storage
Good news! Since the original tutorial, the instructions for running on k3s, k3d, minikube, kubeadm, and Raspberry Pi are now all exactly the same.
Wrapping up
By using inlets and the new inlets-operator, we can now get a public IP for Kubernetes services behind NAT, firewalls, and private networks.
f you completed the tutorial, let me know with a Tweet to @inletsdev.
At around 5 USD per month, your LoadBalancer is a fraction of the cost of a cloud Load Balancer from GCP or AWS where each one costs you 15 USD / mo. If you use Kubernetes Ingress, then you can expose as many websites or APIs as you like through the same inlets Pro tunnel server.
-
Fork or star the code - inlets/inlets-operator
-
Not a Kubernetes user yet? You can automate cloud servers from the CLI instead using the inletsctl
Read other blog tutorials about inlets Pro: