Bare-metal Kubernetes with K3s
Learn how to configure K3s on bare-metal to run a Kubernetes cluster with just as much resilience and fault tolerance as a managed service.
This tutorial is a follow-on from my post Kubernetes on bare-metal in 10 minutes from 2017. The original post focused on getting Kubernetes working across a number of bare-metal hosts running Ubuntu, and then it went on to deploy a microservice and the dashboard. It was a primer, and written to help new users kick the tires with Kubernetes. It used production-ready kubeadm, but only used one master node, meaning it couldn't tolerate a failure.
In this post, I want to provide you with a HA, production-ready cluster on bare-metal infrastructure. We will use Equinix Metal for the hosts, automate the boring parts, but do the rest step by step, so that you can get an understanding on what's going on under the hood.
In the conclusion, we will review the setup and discuss other options for running on-premises or in a homelab with Raspberry Pis. We will also compare kube-vip to other solutions for bare-metal and self-hosted networking.
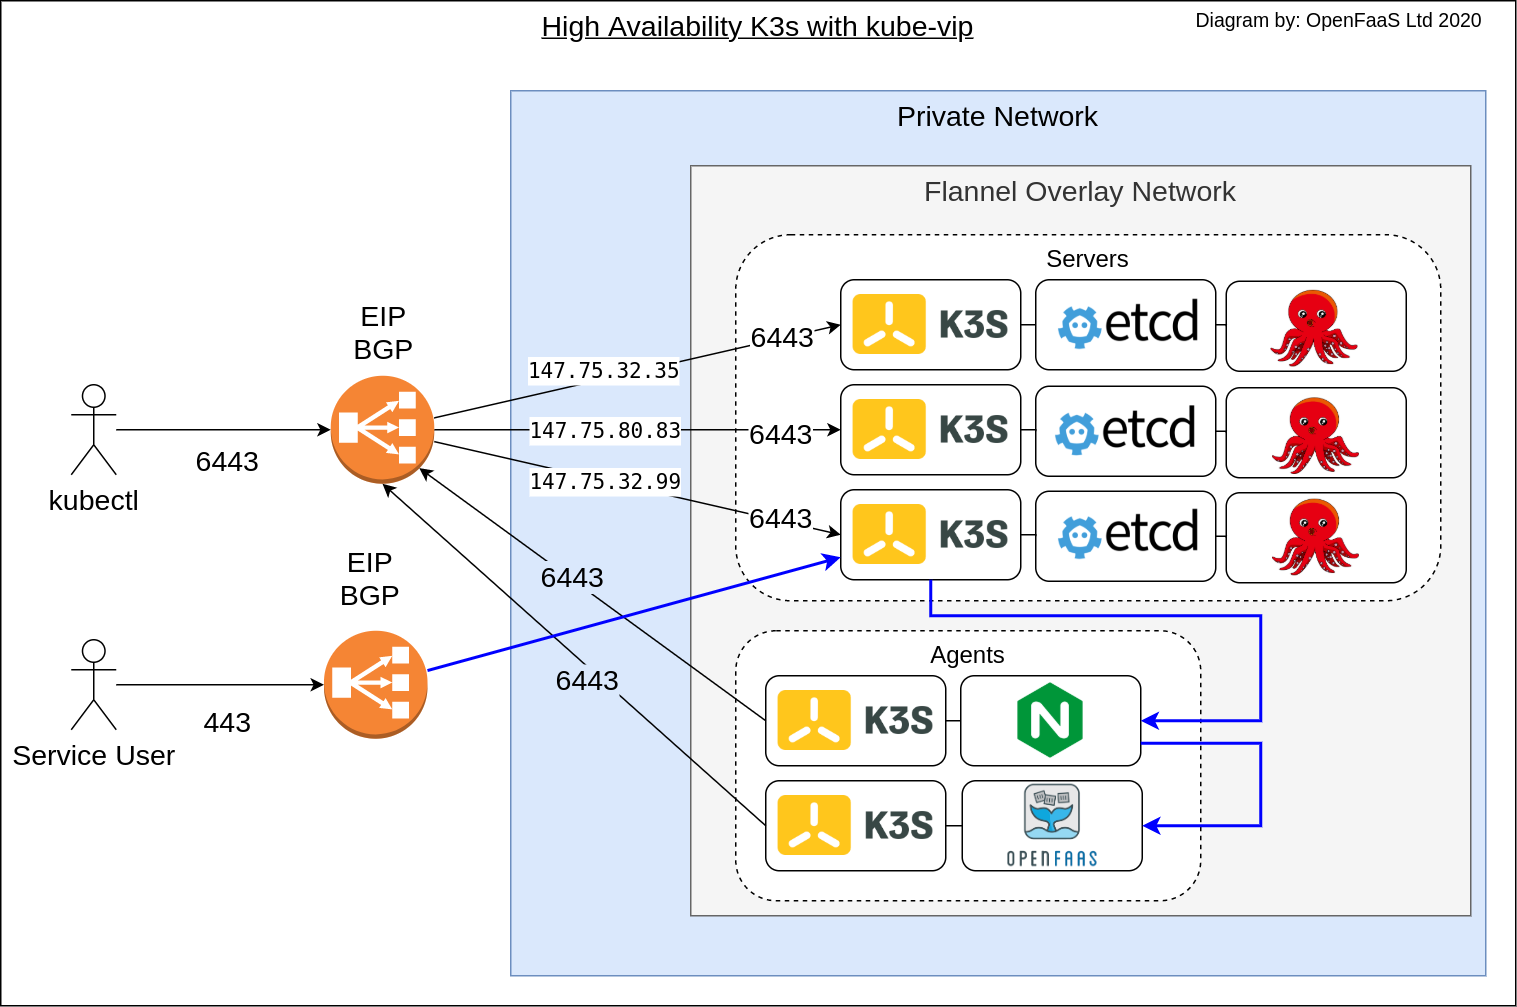
Conceptual diagram: kubectl access provided by the stable EIP. The IngressController also has an EIP which routes traffic for services exposed with Ingress such as the OpenFaaS gateway.
This post also moves from kubeadm to using K3s (a CNCF project), which requires fewer resources for its control-plane and has a built-in HA mode using embedded etcd. K3s has been generally available (GA) and production ready since 2019.
Tutorial
We will use Terraform to create the nodes on Equinix Metal (aka Packet) servers, k3s to create a HA control-plane, and kube-vip to configure a HA IP address for the API server.
The setup will be able to tolerate at least one failure of a server. So unlike the 2017 post, our servers will form a HA cluster, and will also have an Elastic IP (EIP) configured so that the Kubernetes API server will remain accessible if one or more of the servers becomes unavailable.
In a Kubernetes cluster, the Cloud Controller Manager add-on has several responsibilities including node management, routing and managing services. At the end of the tutorial, not only will your cluster have a HA control-plane, a stable IP for the API Server, but Equinix Metal's (CCM) will also allow you to expose services as type LoadBalancer. Each IP address costs around 3.25 USD / mo, you can find out more details on the IP Addresses section of the dashboard.
Skill level: intermediate to advanced. You should be familiar with Kubernetes, networking and public cloud infrastructure.
Install the pre-requisites
Download arkade, a portable Kubernetes marketplace and downloader for DevOps CLIs. It will be used to download the tools we need for the tutorial. You are of course welcome to do things the hard way, if you prefer.
curl -sLS https://get.arkade.dev | sh

# Install the binary using the command given as output, such as:
sudo cp arkade-darwin /usr/local/bin/arkade

# Or on Linux:
sudo cp arkade /usr/local/bin/arkade
Download the following CLIS:
kubectl- the Kubernetes CLIk3sup- a k3s installer that works over SSHterraform- an Infrastructure as code (IaC) tool, which we'll used to create the initial hostskubectx- a fast way to check and switch your Kubernetes context between clusters
arkade get kubectl
arkade get k3sup
arkade get terraform
arkade get kubectx
Follow the step to put these binaries into your PATH:
# Add (k3sup) to your PATH variable
export PATH=$PATH:$HOME/.arkade/bin/
Provision your nodes
We will use terraform to provision three servers and two agents. You can alter these numbers, but three is the minimum number required for K3s' built-in HA mode using etcd.
You may well ask why the entire blog post isn't just a single Terraform command. I can hear you Hacker News. The point of this post isn't to do all the work for you, but to help you understand what is required, and in what order. Creating hosts is boring, so we are going to automate that and save you some time.
Save main.tfvars with the following:
terraform {
  required_providers {
    packet = {
      source = "terraform-providers/packet"
      version = "~> 3.2.1"
    }
  }
  required_version = ">= 0.13"
}

variable "api_token" {
  description = "Equinix Metal API token"
}

variable "project_id" {
  description = "Equinix Metal Project ID"
}

variable "servers" {
  description = "Count of servers"
}

variable "agents" {
  description = "Count of agents"
}

provider "packet" {
  auth_token=var.api_token
}

resource "packet_ssh_key" "key1" {
  name       = "k3sup-1"
  public_key = file("/home/alex/.ssh/id_rsa.pub")
}

resource "packet_device" "k3s-server" {
  count		         = var.servers
  hostname         = "k3s-server-${count.index+1}"
  plan             = "c1.small.x86"
  facilities       = ["ams1"]
  operating_system = "ubuntu_20_10"
  billing_cycle    = "hourly"
  project_id       = var.project_id
  depends_on       = [packet_ssh_key.key1]
}

resource "packet_device" "k3s-agent" {
  count 	         = var.agents
  hostname         = "k3s-agent-${count.index+1}"
  plan             = "c1.small.x86"
  facilities       = ["ams1"]
  operating_system = "ubuntu_20_10"
  billing_cycle    = "hourly"
  project_id       = var.project_id
  depends_on       = [packet_ssh_key.key1]
}

output "server_ips" {
  value = packet_device.k3s-server.*.access_public_ipv4
}

output "agent_ips" {
  value = packet_device.k3s-agent.*.access_public_ipv4
}
Then create main.tfvars
api_token   =   ""
project_id  =   ""
servers     =   3
agents      =   2
Edit api_token and project_id with the values from the Equinix Metal dashboard. The API key is found on your user profile.
If you wish to change the size of the nodes, you can edit c1.small.x86 and use a different value. You can find the options in your dashboard.
Now run the terraform to create the hosts:
terraform init
terraform plan -var-file=main.tfvars
terraform apply -var-file=main.tfvars
When the hosts have been created, you'll get output with your IP addresses.
agent_ips = [
  "147.75.81.203",
  "147.75.33.3",
]
server_ips = [
  "147.75.32.35",
  "147.75.80.83",
  "147.75.32.99",
]
Open a terminal and write environment variables for each:
export SERVER1=""
export SERVER2=""
export SERVER3=""

export AGENT1=""
export AGENT2=""
Save this file as hosts.txt as you may need it again later.
Obtain an IP address for the control-plane
K3s can run in a HA mode, where a failure of a master node can be tolerated. This isn't enough for public-facing clusters, where a stable IP address for the Kubernetes control-plane is required.
We need a stable IP for port 6443, which we could also call an Elastic IP or EIP. Fortunately BGP can help us there. One of our three master nodes will advertise its IP address as the route for the EIP, then if it goes down, another will start advertising. This means our clients can always depend on a stable address of: https://$EIP:6443 for connecting to the Kubernetes API server.
Obtain an IP address from your EM dashboard:
-
IPs & Networks
-
Request IP Address
-
Select the same region that you'll use for the nodes:
-
Pick a
/32for a single IP for the control-plane.
It may take some time for an engineer to approve the request.
Once you have the IP, set it in an environment variable:
export EIP="147.75.100.237"
Add this line to hosts.txt so that you have it, if you need it later.
Enable BGP for each server
Click on each server in the Equinix Metal dashboard. Click on its details page, then BGP. Find the Manage button on the IPv4 row and click "Enable BGP".
This setting allows BGP to be advertised from this server.
Provision the first master
For various reasons, we can only set up kube-vip after K3s has started, so we will create the first master node:
k3sup install \
  --ip $SERVER1 \
  --tls-san $EIP \
  --cluster \
  --k3s-channel latest \
  --k3s-extra-args "--no-deploy servicelb --disable-cloud-controller" \
  --merge \
  --local-path $HOME/.kube/config \
  --context=em-ha-k3s
--tls-sanis required to advertise the EIP, so that K3s will create a valid certificate for the API server.- the
--k3s-channelis specifying the latest version of K3s, which in this instance will be 1.19, by the time you run this tutorial, it may have changed, in which can you can give1.19as the channel, or a specific version with--k3s-version - note the
--clusterflag, which tells the server to use etcd to create a cluster for the servers we will join later on --local-path,--contextand--mergeall allow us to merge the KUBECONFIG from the K3s to our local file.- in
--k3s-extra-argswe disable the built-in K3s service load-balancer, and also disable the cloud-controller, because we will use the Equinix Metal Cloud Controller Manager instead.
Now check your kubeconfig file is pointing at the right cluster:
kubectx em-ha-k3s
Try querying the nodes in the cluster:
[alex@nuc ~]$ kubectl get nodes
NAME           STATUS     ROLES         AGE   VERSION
k3s-server-1   Ready      etcd,master   7s    v1.19.5+k3s2
Apply the RBAC so that kube-vip can access the Kubernetes API and configure services:
kubectl apply -f https://kube-vip.io/manifests/rbac.yaml
Now log into the first server using SSH. There is a one-time configuration option required for each server.
ssh root@$SERVER1

ctr image pull docker.io/plndr/kube-vip:0.3.0

alias kube-vip="ctr run --rm --net-host docker.io/plndr/kube-vip:0.3.0"
export INTERFACE=lo
export EIP="147.75.100.237"

kube-vip vip /kube-vip manifest daemonset \
  --interface $INTERFACE \
  --vip $EIP \
  --controlplane \
  --services \
  --inCluster \
  --taint \
  --bgp \
  --packet \
  --provider-config /etc/cloud-sa/cloud-sa.json | tee /var/lib/rancher/k3s/server/manifests/vip.yaml
The manifest for kube-vip will be created at /var/lib/rancher/k3s/server/manifests/vip.yaml, any files placed here will be run by K3s.
Log out of the server
Deploy the Equinix Metal Cloud Controller Manager
Now deploy the Equinix Metal Cloud Controller Manager (CCM), which will create the /etc/cloud-sa/cloud-sa.json file referenced in the command above.
As configured, the CCM will obtain IP addresses from the Equinix Metal API for any services that are exposed.
Create a secret as follows:
export API_KEY=""
export PROJECT_ID=""

cat <<EOF > ccm-secret.yaml
apiVersion: v1
kind: Secret
metadata:
  name: packet-cloud-config
  namespace: kube-system
stringData:
  cloud-sa.json: |
    {
      "apiKey": "$API_KEY",
      "projectID": "$PROJECT_ID"
    }
EOF
Now apply the secret, then the modified CCM for use with kube-vip:
kubectl apply -f ./ccm-secret.yaml
kubectl apply -f https://gist.githubusercontent.com/thebsdbox/c86dd970549638105af8d96439175a59/raw/4abf90fb7929ded3f7a201818efbb6164b7081f0/ccm.yaml
The gist contains a forked version of the Equinix Metal CCM. This was developed by the author of kube-vip and will be upstreamed, at which point the URL will redirect to the original repo for the CCM.
Check that the CCM and kube-vip pods have started:
kubectl get pods -n kube-system -w
kube-vip-ds and packet-cloud-controller-manager should be "Running", and have no errors.
Provision the additional master servers
Now that we have the first server up and running, and advertising its EIP, we can use it to join our other servers, and later our agents using the EIP.
This is important, because if we used the IP of one of the servers, and that server went down, the agent would no longer be able to communicate with the API server.
k3sup join \
  --ip $SERVER2 \
  --server \
  --server-ip $EIP \
  --k3s-channel latest
--server- tells K3s to join the cluster as a server--server-ip- note that we specified the EIP, and not the IP of any one server here
This command will write a kubeconfig file into your local directory, ignore it and continue to use the one that was merged into your kubeconfig file.
Add the third server:
k3sup join \
  --ip $SERVER3 \
  --server \
  --server-ip $EIP \
  --k3s-channel latest
Add your agents
To add an agent (or worker) node, use the join command from above, but remove the --server flag.
agents=("$AGENT1" "$AGENT2")

for i in ${agents[*]}
do
    k3sup join \
    --ip $i \
    --server \
    --server-ip $EIP \
    --k3s-channel latest
done
Switch your KUBECONFIG to use the EIP
From your own computer, switch your KUBECONFIG to use the EIP instead of the SERVER1 IP which k3sup will have set for you by default.
Edit ~/.kube/config and replace the IP $SERVER1 with the $EIP value.
On MacOS:
export EIP="147.75.100.237"
export SERVER1="147.75.32.35"

sed -ie s/$SERVER1/$EIP/g ~/.kube/config
Then check the file is pointing at the EIP:
cat ~/.kube/config |grep $EIP
    server: https://147.75.100.237:6443
Try using kubectl with the new EIP in place:
kubectl get nodes -o wide
Deploying workloads
The arkade tool we installed earlier not only installs CLIs, but is an open-source Kubernetes marketplace. You can use it on your Raspberry Pi, your Equinix Metal cluster, at work, on your laptop, wherever you want. It provides around 40 Kubernetes applications and is open source, so you can fork it and add your own.
kube-vip works in tandem with the CCM. The CCM will obtain a new IP address for you from Equinix Metal's API, then assign it to any LoadBalancer service in the Pending state. kube-vip then starts advertising the IP address and routing traffic to the nodes.
The quickest example you can find is taken from the inlets-operator README:
kubectl apply -f https://raw.githubusercontent.com/inlets/inlets-operator/master/contrib/nginx-sample-deployment.yaml
kubectl expose deployment nginx-1 --port=80 --type=LoadBalancer
The IP will show up relatively quickly, within a few seconds:
kubectl get svc -o wide -w
NAME         TYPE           CLUSTER-IP    EXTERNAL-IP   PORT(S)        AGE    SELECTOR
kubernetes   ClusterIP      10.43.0.1     <none>        443/TCP        151m   <none>
nginx-1      LoadBalancer   10.43.71.39   <pending>     80:30822/TCP   3s     app=nginx
nginx-1      LoadBalancer   10.43.71.39   <pending>     80:30822/TCP   5s     app=nginx
nginx-1      LoadBalancer   10.43.71.39   147.75.80.22   80:30822/TCP   5s     app=nginx

NGINX_IP=$(kubectl get svc/nginx-1 -o jsonpath="{.spec.loadBalancerIP}")

curl -s http://$NGINX_IP | grep "<title>"
<title>Welcome to nginx!</title>

kubectl delete svc/nginx-1
To get the Kubernetes dashboard up and running simply run:
arkade install kubernetes-dashboard
The output will tell you how to obtain a token and how to log into the dashboard. You can get this information back at any time by typing in:
arkade info kubernetes-dashboard
By default Traefik 1.x is installed with K3s, you can disable that or delete it and then install your preferred IngressController with:
kubectl delete svc/traefik -n kube-system
kubectl delete deploy/traefik -n kube-system
arkade already ships with four options for IngressControllers. You can also run arkade get helm and then use your favourite helm chart, if it's not already available below.
arkade install ingress-nginx
# Or
arkade install traefik2
# Or
arkade install nginx-inc
# Or
arkade install kong-ingress
Add cert-manager:
arkade install cert-manager
Once you find the IP address of your IngressController, you can create a DNS record for any ingress records you may create, and then get TLS certificates for free from LetsEncrypt.
To install OpenFaaS, with an encrypted TLS endpoint, run:
export DOMAIN=gateway.example.com
arkade install openfaas
arkade install openfaas-ingress \
  --email webmaster@$DOMAIN \
  --domain $DOMAIN
In this example, you would need to create a DNS A record for gateway.example.com using the IP of your IngressController. Then you can go ahead and log into OpenFaaS or open it in a browser using its URL of: https://gateway.example.com.
To host a Docker registry simply run:
export DOMAIN=registry.example.com
arkade install docker-registry
arkade install docker-registry-ingress \
  --email webmaster@$DOMAIN \
  --domain $DOMAIN
To get the domain working, you'd just create the DNS record as per above for registry.example.com and point it at the IngressController.
By using Ingress, you can save on costs and on IP addresses, which as I mentioned in the intro cost around 3.25 USD / mo.
Linkerd and Istio are also just one command way.
Type in arkade install --help for a complete list.
Wrapping up
In the tutorial, we showed how kube-vip can integrate with BGP when used on Equinix Metal's bare-metal cloud to provide a stable IP.
The control-plane is HA and can tolerate at least one failure, because we configured K3s to use its built-in clustering mode. The built-in clustering mode uses and embedded version of etcd to synchronise the servers.
The API server on port 6443 was made HA and can also tolerate a failure. This is because the IP address of the API Server was the EIP, provided by BGP. We updated our kubeconfig file and our additional servers and agents to use the EIP for their cluster join commands.
The Cloud Controller Manager also uses BGP to provide an IP address for any services you wish to expose with a Kubernetes LoadBalancer.
Whilst this blog post took much longer to write, and is more involved than the initial post from 2017, it produces a cluster that is highly available, fast, and ready to run production workloads.
Bare-metal without BGP
If you are running Kubernetes at your workplace or within your homelab and do not have access to BGP, then there are other options.
For instance, you may be able to use ARP instead. ARP will broadcast a virtual IP (VIP) within your local network, so that your clients can still use a stable IP address. ARP can also be used with your Raspberry Pi clusters, but bear in mind that K3s is having issues with the older RPi3 and CM3.
DNS round-robin is also an option for configuring a stable endpoint, but caching and the time taken to propagate to your clients could make it less practical.
Alternatively, if you are using a managed cloud which offers native L4 load-balancers you do not need to use a tool like kube-vip. Clouds such as AWS, GCP, Azure, and DigitalOcean all offer their own managed load-balancers.
See an example of using DigitalOcean's managed LB in a post I recently wrote for Rancher: Set up Your K3s Cluster for High Availability on DigitalOcean
The other missing piece for on-premises clusters is the lack of Ingress, of reachable, routable IP addresses. This can be a particular problem if firewall ports cannot be opened, or port-forwarding rules are unavailable. Then solutions like Cloudflare's Argo Tunnel provide a way to expose services.
More recent open source projects like the inlets-operator integrate directly into Kubernetes like a Cloud Controller Manager to provide TCP tunnels for services you expose, such as your IngressController or a microservice. inlets PRO has also become popular for self-hosting on a Raspberry Pi cluster or homelab.
MetalLB is also a popular tool for on-premises Kubernetes networking, however its primary use-case is for advertising service LoadBalancers instead of advertising a stable IP for the control-plane. kube-vip handles both use-cases, and is under active development by its author, Dan.
Further resources
Here are two additional blog posts on K3s and advanced networking, which may be of interest to you:
- Walk-through — install Kubernetes to your Raspberry Pi in 15 minutes
- Get Ingress to LoadBalancers and IngressControllers on private K3s/K8s clusters
- Set up Your K3s Cluster for High Availability on DigitalOcean
The tools we used are open source and available on GitHub:
- k3sup - K3s installer using SSH
- arkade - portable Kubernetes marketplace
- kube-vip - Kubernetes control-plane and service load-balancer, developed by Daniel Finneran
- inlets-operator - get Ingress and TCP LoadBalancers on private hosts behind a firewall or NAT
For full disclosure: Equinix Metal is a client of OpenFaaS Ltd. Thank you to the team for providing clients and to Dan for bringing support to kube-vip for K3s.