Docker Secrets in action: Github integration
Secret management was added the Docker product in the 1.13.1 release and enables you to use secrets such as API keys, passwords and tokens in your production applications.
In this post we'll look at what is required to integrate a secret into an application. The example is using a token to securely integrate with Github events through webhooks.
This post is split into three sections:
- Introduction
- Understanding the stack
- Putting it all together
Introduction
You may want to get notifications from your Github repositories or organizations - or you could be building an application around data on Github. You can do this by adding a new public URL to the Settings -> Webhooks page in the Github UI.
When an event you've subscribed to occurs then the Github servers will send an HTTP POST over to your endpoint. An example could be that someone forks your code or submits a Pull Request.
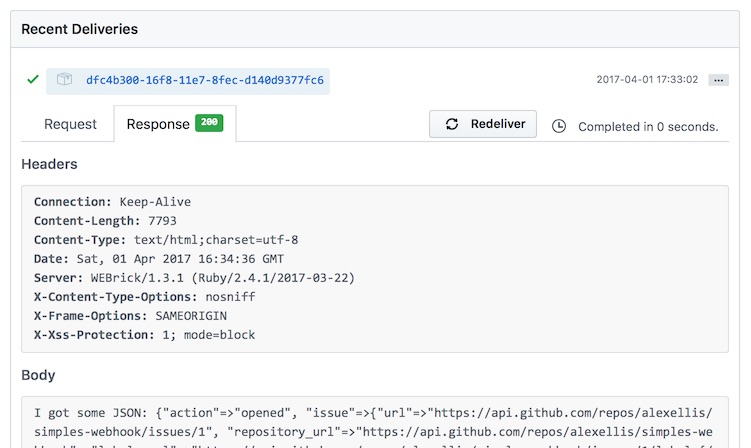 Example: viewing triggered events
Github has a Ruby code sample that shows how to verify the signature of the incoming web hook against a shared stored in an environmental variable.
- Github: Securing your webhooks
The Docker team made a design-decision to avoid storing credentials and secrets within environmental variables. Instead it provides files under the /run/secrets/<secret_name> mount in a tempfs. This means that all existing applications that expect to read secrets from the environment will need to be modified or adapted.
It turns out this is a relatively simple change in the Ruby code:
  secret_token = ENV['SECRET_TOKEN']
  puts secret_token
before
  secret_token = File.read("/run/secrets/github_webhook").strip
  puts secret_token
after
Understanding the stack
Here's what we'll need from a Docker perspective:
- Docker 1.13 or newer
- Docker Swarm (this could be a single host)
- The altered Ruby application from the Github documentation
docker runcannot make use of secrets, so we will have to create a service
Docker secrets can be created on the command-line, but a Docker Compose file is easier because we can define the service, secrets and which service can access which secret all in one place.
version: "3.1"
services:
  github_responder:
    ports:
      - 4567:4567
    image: alexellis2/github-secret-integration
    secrets:
      - github_webhook

secrets:
  github_webhook:
    file: ./github_webhook.secret
Note: To use secrets you will need to declare your compose file as
version "3.1".
Once the github_responder service is created it will have access to a file called github_webhook at /run/secrets/github_webhook.
Github's sample Ruby code:
A rudimentary webhook responder with no security would look like this:
require 'sinatra'
require 'json'

post '/payload' do
  push = JSON.parse(params[:payload])
  "I got some JSON: #{push.inspect}"
end
The Github example is enhanced to read an environmental variable and verify the message is correct. I've changed the code to read the secret created by Swarm:
require 'sinatra'
require 'json'

set :bind, '0.0.0.0'

post '/payload' do
  request.body.rewind
  payload_body = request.body.read
  verify_signature(payload_body)
  push = JSON.parse(params[:payload])
  "I got some JSON: #{push.inspect}"
end

def verify_signature(payload_body)
  secret_token = File.read("/run/secrets/github_webhook").strip

  signature = 'sha1=' + OpenSSL::HMAC.hexdigest(OpenSSL::Digest.new('sha1'), secret_token, payload_body)

  return halt 500, "Signatures didn't match!" unless Rack::Utils.secure_compare(signature, request.env['HTTP_X_HUB_SIGNATURE'])
end
handler.rb
What's going on in the code?
Github's example doesn't transmit your secret in plaintext, it effectively signs the payload and then because you own the key you can sign it locally and compare the values.
Here's an example Header:
Request URL: http://pwd10_0_24_3-4567.host3.labs.play-with-docker.com/payload
Request method: POST
content-type: application/json
Expect:
User-Agent: GitHub-Hookshot/a837270
X-GitHub-Delivery: ea7e4880-16f6-11e7-9943-6612cc3958ce
X-GitHub-Event: ping
X-Hub-Signature: sha1=15652f5a65670d9e57b185c1e3fe4ccd90bd3102
This is better than sending your API-key or secret in plain-text, but does involve slightly more work for you in your application.
For this tutorial we will use a Docker image that I've already published on the Docker Hub. This is the Dockerfile I wrote:
FROM ruby:alpine
WORKDIR /root/
RUN gem install sinatra rack
COPY handler.rb .
CMD ["ruby", "handler.rb"]
Dockerfile
It uses the light-weight Linux distribution Alpine Linux, adds the Ruby sinatra web server package and then the rack package which provides us with Github's Ruby utilities.
Putting it all together:
Configure Github
Head over to Github and create a sample repository and enable webhooks.
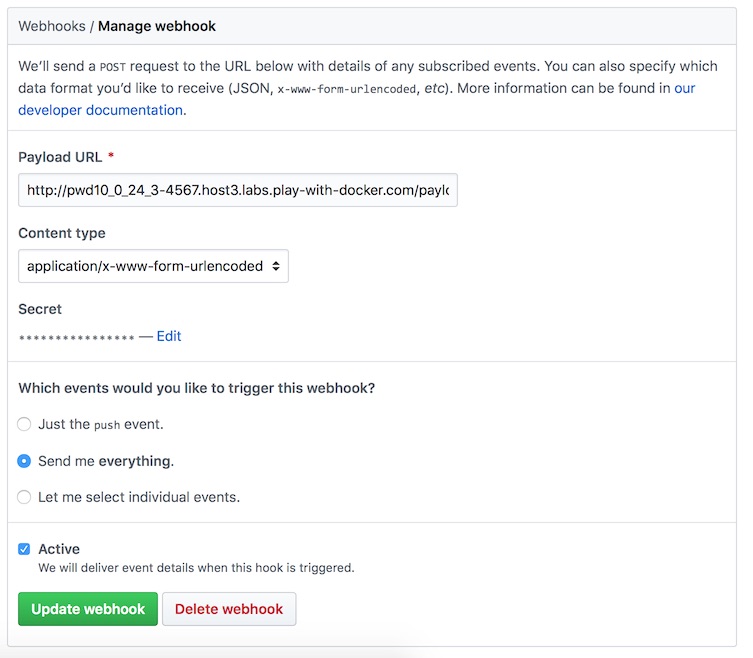
Paste your publicly exposed URL into the Payload URL.
You temporarily publish any HTTP service from your laptop on the Internet with Ngrok.
Make sure the Content-type is x-www-form-urlencoded since the example code expects this format.
Now select which events you want to opt into:
- Just
git pushevents - Everything
- Individual events - such as "watchers" which means a new Star was added to the repository
Finally enter a secret. I used docker.
Create your secret and deploy your stack
Now create a file named github_webhook.secret and put the secret in it, so it should be docker if you used the same one as me.
In the same directory create a docker-compose.yml file like below:
version: "3.1"
services:
  github_responder:
    ports:
      - 4567:4567
    image: alexellis2/github-secret-integration
    secrets:
      - github_webhook

secrets:
  github_webhook:
    file: ./github_webhook.secret
Deploy your stack:
$ docker stack deploy github --compose-file ./docker-compose.yml
For
docker stack deployyou can use-cinstead of--compose-fileif you want to save on typing.
Now you can head over to Github and trigger an event such as creating an issue.
Now you'll see a success message for your function containing the relevant details from the event.
If you want to prove the security works:
- Change the secret in the local
github_webhook.secretfile or on the Github web hook page - Trigger another event
- Visit the webhooks page on Github and you should see an error in the Response from your server. You can also check your local Docker container logs
You can also revoke a secret at any time with the
docker secret rmcommand.
In summary
We've now applied Docker Swarm secrets to integrate with Github events securely. We needed to make a small modification to the sample code, but that was relatively painless.
You can use this approach as a template for your own applications. I'm including some additional resources below.
Wrapping up:
Follow me on Twitter for more Docker news and tutorials.
Follow on Twitter @alexellisuk
Related tutorials:
- Docker Stacks and Attachable networks
- Introducing Functions as a Service (FaaS)
- Test-drive Docker Healthcheck in 10 minutes
The official Docker docs: