First look at knative build for OpenFaaS functions
In this post I'll take a detailed first look at how to use knative build to build a Docker image for an OpenFaaS function on Kubernetes. By the end of the post we'll have built a Docker image for an OpenFaaS function using Node.js and then we'll explore how to make that more generic to use across multiple functions.

Background
The knative build component can be deployed separately to the other components such as: Serving and Eventing. Its primary use-case is in-cluster builds on Kubernetes using declarative one-shot jobs in a similar fashion to what we would traditionally create with Jenkins.
Once you have a working Build definition for your project you can extend it into a BuildTemplate and start parameterizing it to include things like Git revision in the Docker image name, to use a custom git branch and so on.
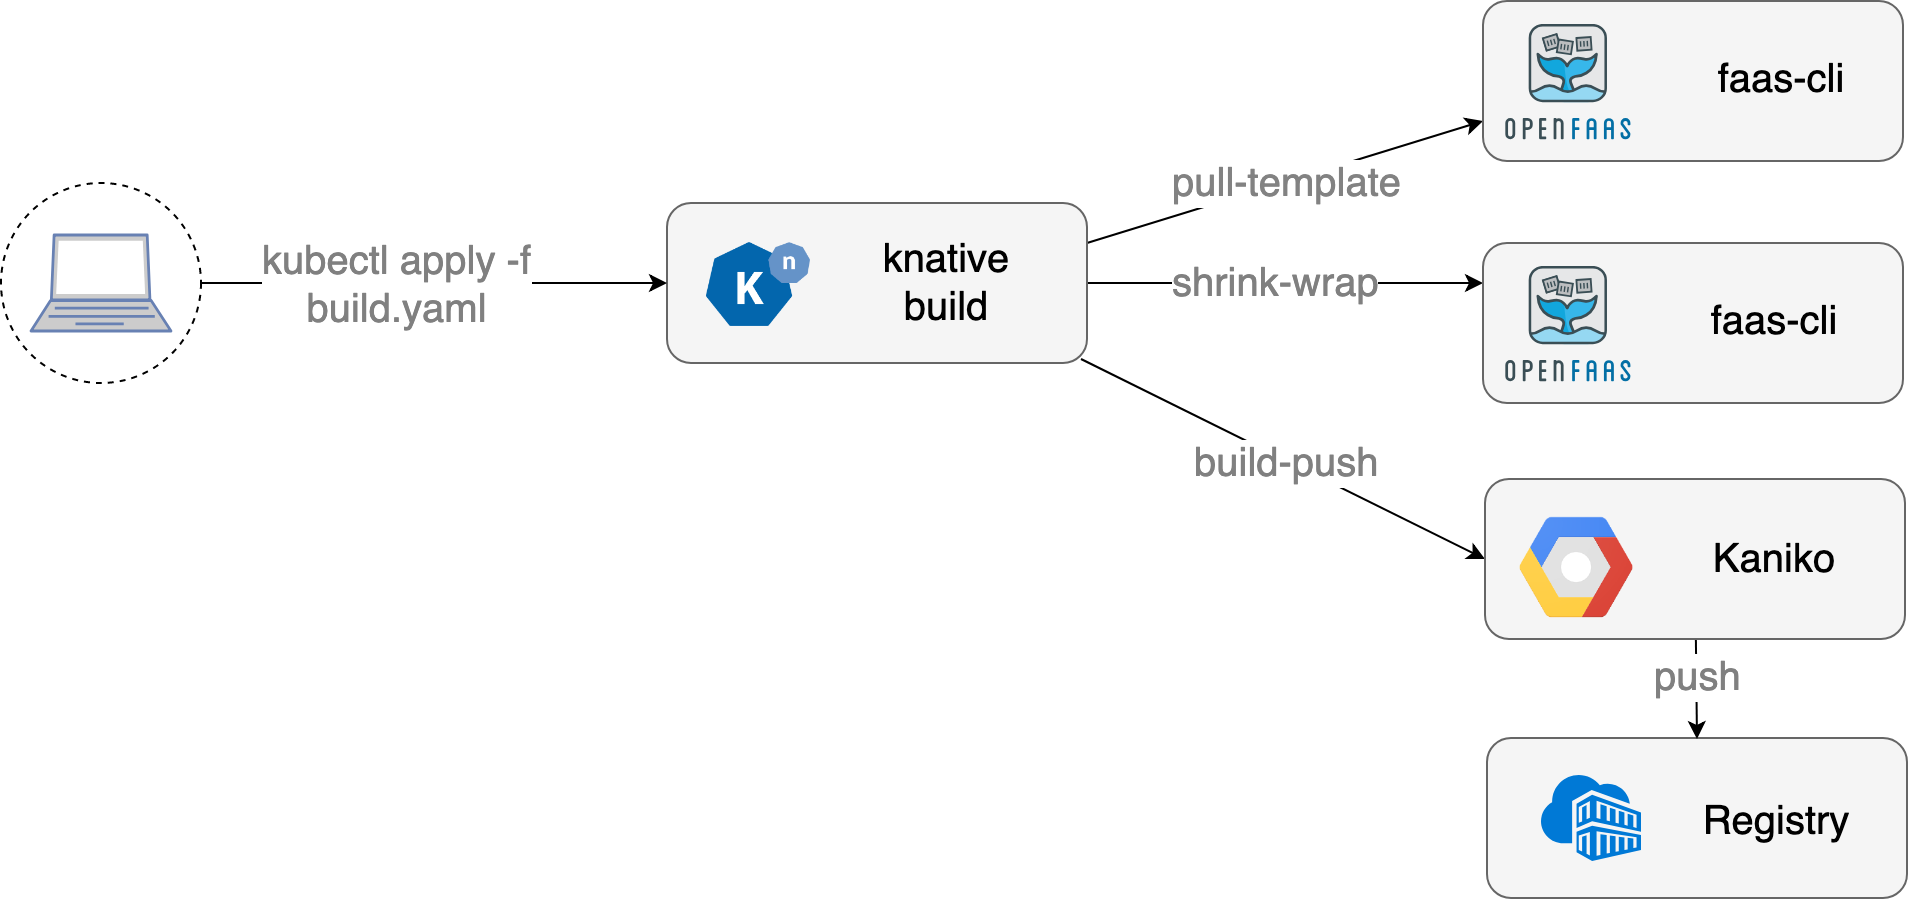
The build job is represented by a Build Custom Resource Definition or CRD. These are YAML files which can be loaded into the cluster using kubectl apply -f filename.yaml.
In this post I'll write an example for use with the faas-cli and a repository where I have one function.
Pre-requisites
You can follow this tutorial without installing OpenFaaS or the CLI, but it may make more sense if you do.
You can use my GitHub repository as an example or create your own repository and populate it like this:
git clone https://github.com/myaccount/example
cd example

faas-cli template store pull node10-express
faas-cli new --lang node10-express node-tester
This will generate the following files:
node-tester/handler.js
node-tester/package.json
node-tester.yml
Example handler:
"use strict"

module.exports = (event, context) => {
    let err;
    const result =             {
        status: "You said: " + JSON.stringify(event.body)
    };

    context
        .status(200)
        .succeed(result);
}
You can find out how to leverage the OpenFaaS template by finding its GitHub repository and then checking out its README.
faas-cli template store describe node10-express

Name:              node10-express
Platform:          x86_64
Language:          NodeJS
Source:            openfaas-incubator
Description:       NodeJS 10 Express template
Repository:        https://github.com/openfaas-incubator/node10-express-template
Official Template: true
I tend to the function's YAML file i.e. node-tester.yml to stack.yml which is the default and makes for less typing. If you don't want to rename the file then pass the -f or --yaml parameter to each faas-cli command.
Tutorial
First create a Kubernets cluster, this could be using kind, a remote cluster or your existing one.
Install knative build
Now install the knative build components. These are not packaged with helm, but as plain YAML files:
kubectl apply -f \
 https://github.com/knative/build/releases/download/v0.5.0/build.yaml
See also: docs: install knative build
You can check to see when the rollout is completed:
kubectl rollout status --namespace knative-build \
  deploy/build-controller

kubectl rollout status --namespace knative-build \
  deploy/build-webhook
When they're up you'll see:
deployment "build-controller" successfully rolled out
deployment "build-webhook" successfully rolled out
Define secret to push the image
We can now define a secret for pushing a Docker image to the Docker Hub or another remote registry.
Create regcred.yaml:
apiVersion: v1
kind: Secret
metadata:
  name: regcred
  annotations:
    build.knative.dev/docker-0: https://index.docker.io/v1/
type: kubernetes.io/basic-auth
stringData: #NOT Base64 encoded
  username: username-here
  password: password-here
Now apply it with kubectl apply -f regcred.yaml
See also build authentication
Define a service account for the build
In order to grant access to secret above we need to create a Kubernetes service account.
apiVersion: v1
kind: ServiceAccount
metadata:
  name: build-bot
secrets:
  - name: regcred
Save the file and apply via kubectl apply -f build-bot.yaml
If you already use the name build-bot for other purposes, then you can use another name.
Define the build
Here is the build for a Node.js function using the node8-express template from the template store.
apiVersion: build.knative.dev/v1alpha1
kind: Build
metadata:
  name: openfaas-cloud-test-build
spec:
  serviceAccountName: build-bot
  source:
    git:
      url: https://github.com/alexellis/openfaas-cloud-test.git
      revision: master
  steps:
  - name: pull-template
    image: openfaas/faas-cli:0.8.8
    command: ["faas-cli"]
    args: ['template', 'store', 'pull', 'node8-express']
  - name: shrinkwrap
    image: openfaas/faas-cli:0.8.8
    command: ["faas-cli"]
    args: ['build', '--shrinkwrap']
  - name: build-push
    image: gcr.io/kaniko-project/executor:v0.7.0
    args:
      - "--context=dir:///workspace/build/timezone-shift"
      - "--dockerfile=/workspace/build/timezone-shift/Dockerfile"
      - "--destination=docker.io/alexellis2/openfaas-cloud-test:0.1.1"
Note the following about the build:
source- here the GitHub repository is defined, which is public and therevisionismaster. This is configurable and provides the source codeserviceAccountName- this is how the Docker Hub push secret is bound to the build and made available

Each build step is specified as a command and a set of ordered arguments in a similar syntax to what you may have used in a Dockerfile's CMD entry.
pull-template- this is only needed if using the template store. If you use a default template such asgothen the pull happens automatically in thebuildstep`shrinkwrap- this step takes the source code, the OpenFaaS template and emits abuildfolder without invoking Docker. Thebuildfolder will contain a build context and Dockerfile that can be used with any container builderbuild-push- in this final step we use a pinned version of Kaniko to build, then push the image to the Docker Hub. It appears that version 0.8.0 and 0.9.0 has a bug that prevents working with the registry. I used three standard flags including--context=dir://which specified the root to use to build the Dockerfile. I pointed this at the directory generated by the shrinkwrap stage.
See also: Kaniko docs and build arguments.
Apply the YAML file to start the build:
kubectl apply -f openfaas-cloud-test-build.yaml
You can view the progress of the build with kail -n default which will output the logs from each container and Pod in the given namespace.
See also: boz/kail
You can also describe the CRD entry to check on each step of the build:
kubectl describe build/openfaas-cloud-test-build
Now the above is very similar to Google's Cloud Build product. In fact the equivalent file would be:
steps:
## Shinkwrap
- name: 'gcr.io/$PROJECT_ID/faas-cli:0.8.8'
  args: ['faas-cli', 'template', 'store', 'pull', 'node8-express']
- name: 'gcr.io/$PROJECT_ID/faas-cli:0.8.8'
  args: ['faas-cli', 'build', '--shrinkwrap']
## Build Docker image
- name: 'gcr.io/cloud-builders/docker'
  args: ['build', '-t', 'gcr.io/$PROJECT_ID/timezone-shift:$REVISION_ID', '-t', 'gcr.io/$PROJECT_ID/timezone-shift:latest', '-f' ,'./build/timezone-shift/Dockerfile', './build/timezone-shift/']

images:
- 'gcr.io/$PROJECT_ID/timezone-shift'
Note that in Cloud Build the use of templates makes the file more generic. In knative build that task is best served through the BuildTemplate CRD.
Enter the BuildTemplate
We can now start to parameterize the Build for use across multiple repositories.
Let's paramaterize the Docker Hub name and function name.
Define the BuildTemplate
apiVersion: build.knative.dev/v1alpha1
kind: BuildTemplate
metadata:
  name: node8-express-openfaas
spec:
  steps:
  - name: pull-template
    image: openfaas/faas-cli:0.8.8
    command: ["faas-cli"]
    args: ['template', 'store', 'pull', 'node8-express']
  - name: shrinkwrap
    image: openfaas/faas-cli:0.8.8
    command: ["faas-cli"]
    args: ['build', '--shrinkwrap']
  - name: build-push
    image: gcr.io/kaniko-project/executor:v0.7.0
    args:
      - "--context=dir:///workspace/build/${FUNCTION}"
      - "--dockerfile=/workspace/build/${FUNCTION}/Dockerfile"
      - "--destination=${IMAGE}"
Save this file and apply it with kubectl apply -f node8-express-openfaas-template.yaml
Define a new build
When we have a working template, we'll be able to cut down on our build significantly. Now we just define the source, the template and a number of parameters.
apiVersion: build.knative.dev/v1alpha1
kind: Build
metadata:
  name: ofc-templated-test-build
spec:
  serviceAccountName: build-bot
  source:
    git:
      url: https://github.com/alexellis/openfaas-cloud-test.git
      revision: master
  template:
    name: node8-express-openfaas
    kind: BuildTemplate # (or ClusterBuildTemplate)
    arguments:
    - name: IMAGE
      value: docker.io/alexellis2/openfaas-cloud-test:0.2.0
    - name: FUNCTION
      value: timezone-shift
Save the above as ofc-templated-test-build.yaml and apply with kubectl apply -f.
You should now see some logs appear on your terminal via kail and output on the build:
kubectl describe build/ofc-templated-test-build
Wrapping up
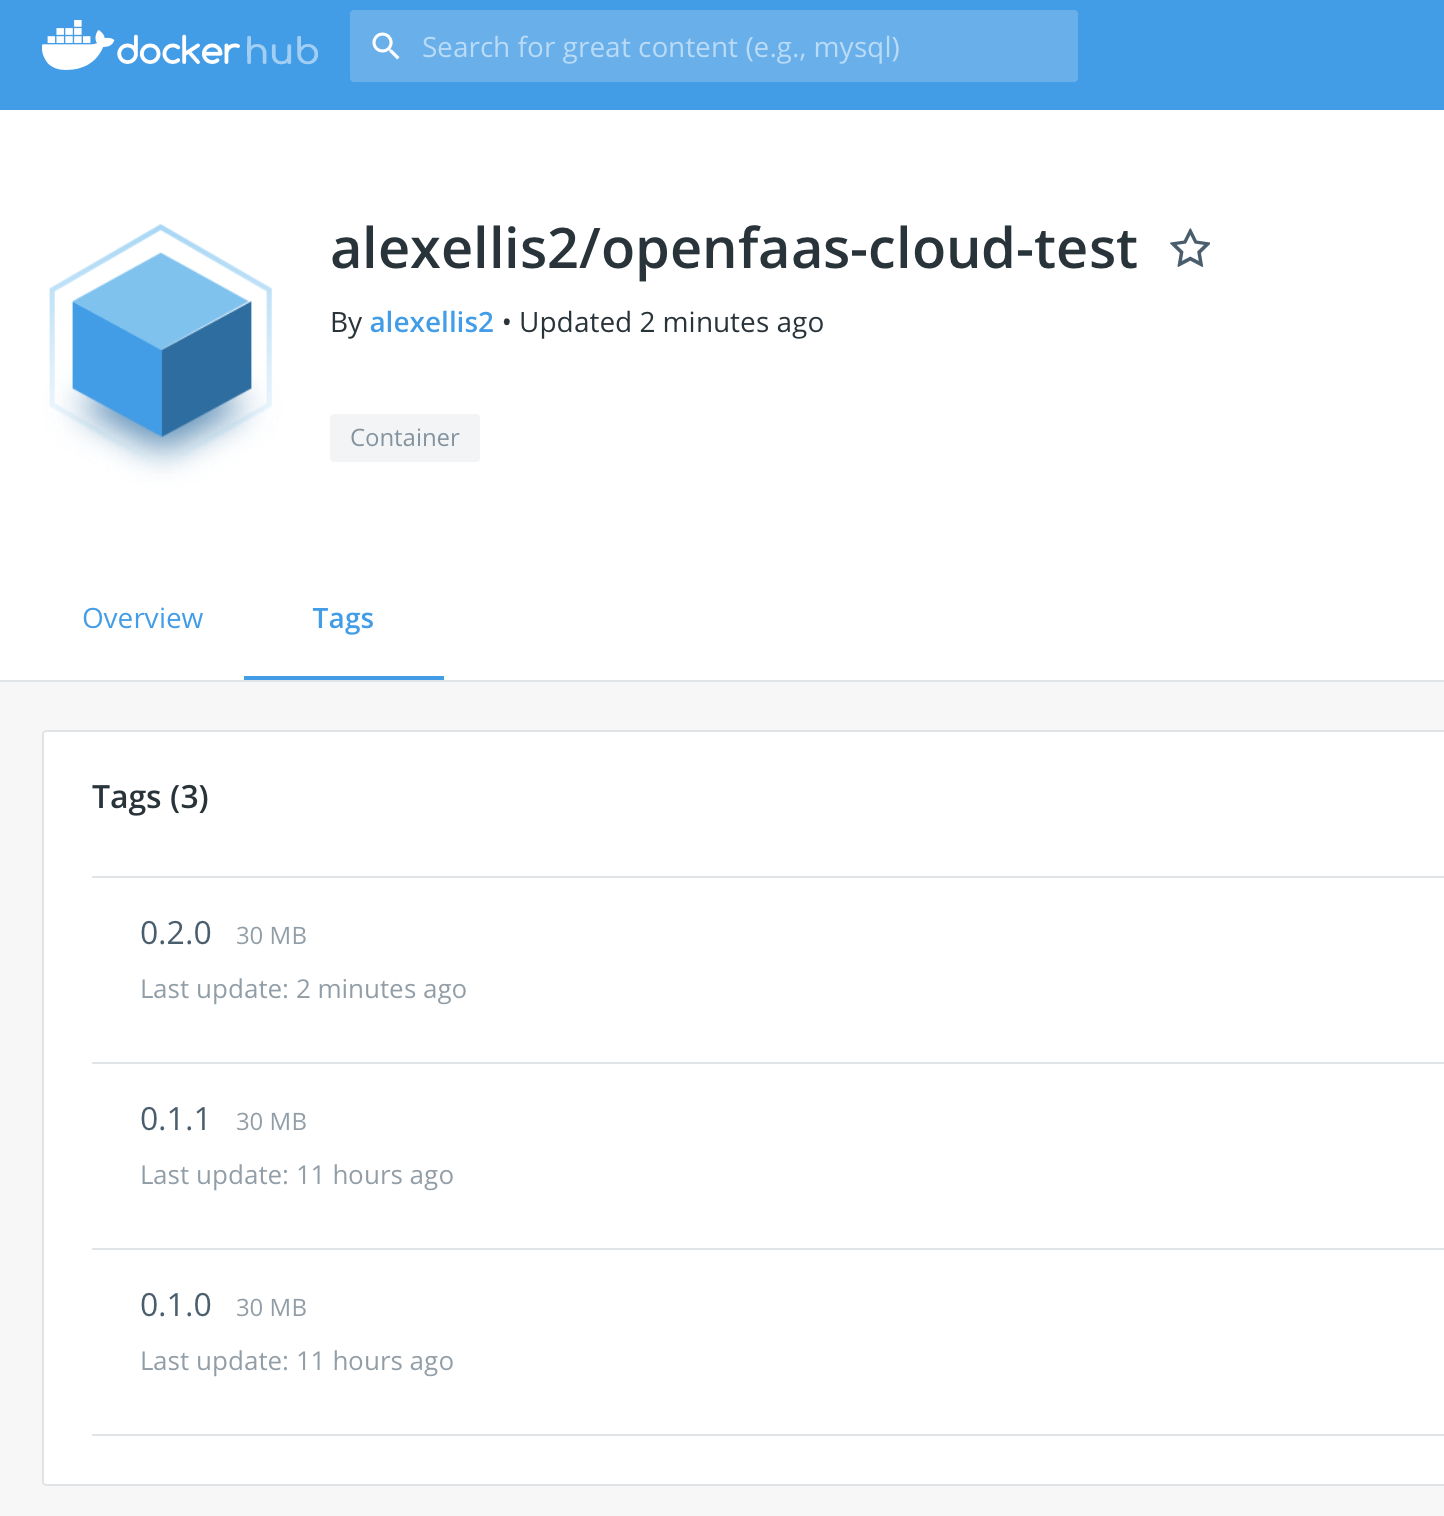
I can see my two builds on the Docker Hub - the first was created through a Build with hard-coded values and the second was created through a more generic BuildTemplate which I can also use with other repos and projects.

In the past I've written about BuildKit and Kaniko separately - both projects have pros and cons. My impression is that the Google team behind Knative are using kaniko and recommend the tool because it's daemonless and can run as a non-privileged container, it does however run as root. An alternative is BuildKit which is also supported. To find out more checkout the BuildKit BuildTemplate.
In a short period of time we were able to install knative build, define a working build and push secret for the Docker Hub and then parameterize the build definition to reduce duplication. For a small team that is shipping functions and microservices, knative build could provide a lean alternative to a full Jenkins deployment, but there are some drawbacks mainly around the user-experience.
I do have some concerns about whether large enterprise teams will adopt a tool like knative build for shipping their products. In my experience CI / CD is often provided as a service by an internal team which may also cover shipping legacy products with complicated edge cases.
Final word - the declarative approach aligns very well with the recent push by the Kubernetes community to embrace CRDs. I would expect us to see a number of new projects emerging which add a UI and a more accessible CLI to the Build/Template CRD.