Docker Swarm on Raspberry PI
Update (15 Feb 2016)
Since this article was published Docker and Swarm have gone through some changes meaning not all of the steps below will be accurate.
Please see my Github Repo for the latest build scripts and outline of instructions: docker-arm repo.
Quick overview
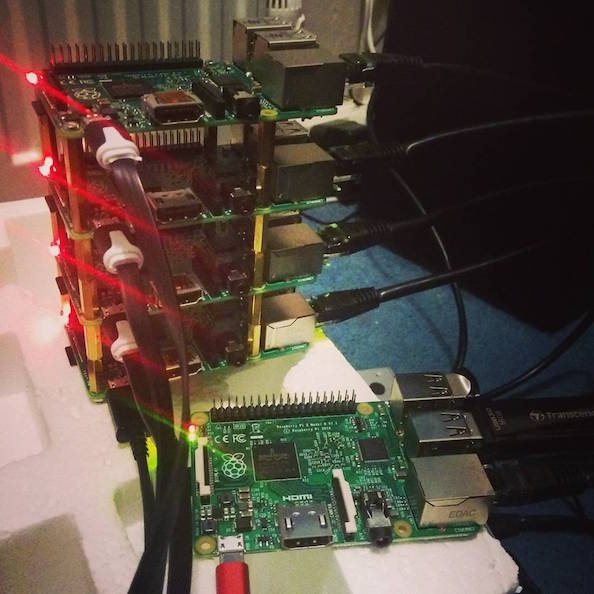
I have connected power to each Raspberry PI 2 board through a 6xUSB charger plug that can supply 2A per device. The network connections are going into an 8 port switch that is then plugged into my main switch.
I used Arch Linux as the host operating system and configured a single PI with Docker and a static IP address. I then used tar to back up root filesystem and decompress it on to all the other SD cards, just changing the static IP address and hostname before booting them up.
TL;DR
- Make sure you have
go1.4.2 installed/available - Download
godep, and clone the Docker swarm github repository - Build swarm with static linking arguments (resulting in ARM-compatible binary)
- Build new image with new swarm (ARM) binary instead of supplied x86_64 binary
- Continue as per docker.com documentation
Initial attempt and results
As long as the kernel is built with container support and is a late enough release then Docker will install trouble-free on an ARMv7 device such as a Raspberry PI. The problems appear as soon as you pull an image down from the Docker Hub built for a 'standard PC' in x86_64 format and try to run it, you'll get output like this:
$ docker run swarm
Unable to find image 'swarm:latest' locally
latest: Pulling from swarm

cf43a42a05d1: Pull complete
...
Status: Downloaded newer image for swarm:latest
exec format error
Error response from daemon: Cannot start container 46bcef4d09973936e07627f4c9321a8105bd47be866766aca3b59fcbc3c05d9c: [8] System error: exec format error
The error System error: exec format error is telling us that the binary in the swarm image was built for a different platform and architecture. We need to build the swarm binary from source so that the compiler can re-write all the instructions appropriately.
Alternatively, we can download a binary file that someone else has built and published online. Exercise caution here, if the source is not trusted.
Rebuilding the swarm binary
The following steps were tested on Arch Linux ARM, which is a minimal rolling release of GNU/Linux. You could do the same with Ubuntu/Raspbian/Debian.
-
Install the
goprogramming language by either building the source code or downloading binaries from an alternative source. If you use a package manager for the installation then make sure the version of go is 1.4.2 withgo -version -
Set your
GOPATHvariableexport GOPATH=~/go/ -
Install
godepwithgo get github.com/tools/godep -
Follow the build steps for docker/swarm from the docker/swarm repo, but with a slight adjustment for a statically linked executable:
$ mkdir -p $GOPATH/src/github.com/docker/
$ cd $GOPATH/src/github.com/docker/
$ git clone https://github.com/docker/swarm
$ cd swarm
$ $GOPATH/bin/godep go install -v -a -tags netgo -installsuffix netgo -ldflags '-extldflags
"-static" -s' .
- We will now have a swarm executable built for ARMv7 which can be deployed into an docker image similar to the 'swarm' version mentioned above. The Dockerfile is kept simple because it only needs to run the one executable. I suggest naming it
arm-swarm. You will find the binary at$GOPATH/bin/.
At this point all the commands on the docker tutorial can be followed to the letter replacing the image name swarm with arm-swarm wherever you see it.
Sample swarm Dockerfile
FROM scratch
COPY ./swarm /swarm

ENV SWARM_HOST :2375
EXPOSE 2375

VOLUME /.swarm

ENTRYPOINT ["/swarm"]
CMD ["--help"]
Build the image and tag it:
docker build -t arm-swarm:latest .
Once you have the image built, you can export it with docker save and import the .tgz with docker load on your other PIs or just copy the Dockerfile and swarm binary and build it on each PI.
Starting the swarm
The first step is to create a swarm cluster token, run the image with the parameter create this outputs a key/ID for your PIs to use.
$ docker run arm-swarm create
f9cc2f969d21640ab534d3d53211f931
Here, our <tokenid> is the text f9cc2f969d21640ab534d3d53211f931
Run the manage command on one of the PIs, or on your laptop. It is important that all machines in the cluster are using the same binary version of the docker client and docker engine
docker run -d -p 2378:2375 arm-swarm manage token://<tokenid>
By default the token:// discovery method will connect to the internet and ask docker's online hub for any nodes reporting the same token.
On the PIs/swarm nodes create runswarm.sh.
1 #!/bin/bash
2 export token=\
3 <tokenid>
4 echo Running "docker run -d arm-swarm join --addr=192.168.1.2:2377 token://$token"

5 docker run -d arm-swarm join --addr=192.168.1.2:2377 token://$token
Alter the token on line 2 and the IP address on line 4 and 5 to match the Raspberry PI node itself. Note: we do not need to specify the IP address of the 'manage' node.
Once the nodes have started it will take 10-20 seconds for them to register at the docker hub and this data will be pulled by your PI running the swarm manage command.
On your controller (either the manage node) or your PC/laptop run:
export DOCKER_HOST=tcp://192.168.1.1:2378
Use the IP address of the manage node and the port on left hand side of our command (the host port).
Tasking the swarm
The swarm can be tasked in the same way a single docker would be. docker ps/run/build all work in much the same way.
Try running docker info, when I ran this on my 5x Raspberry PI 2 cluster it reported 20CPUs and 5GB of RAM.
I have found that the build command will target a random node, and once the image is built I manually have to copy it from node to node or upload it to a Hub/registry and pull it down to each node. See also: docker save/load.
Limitations and warnings
Architecture of images in the hub
Just as the above swarm image failed to work due to an 'exec' error, any other image built for x86_64 will fail in the same way. So when you find an interesting Dockerfile you want to try then you will have to alter the FROM statement and replace Ubuntu/Debian etc with an ARMv7 equivalent image.
All the ARMv7 images are built by enthusiasts and none are currently official meaning: think twice before trusting them. It goes without saying that if they contain malware, then they could wreak havoc on your system.
You will probably have to build your own base image using scripts provided by main Linux distributions for the Raspberry PI. Arch Linux and Debian provide reliable methods for this. If you are lucky, the enthusiast images will also share the scripts needed to rebuild their image from scratch.
Discovery using token://
Discovery using token:// means each of your nodes and your manage node is constantly sending data about your network and internal IP addresses to docker hub. This is probably not a good idea for a production system. Look into other methods such as using etcd or consul. See the docker.com website.
Insecure mode/no-TLS
The commands I have provided are taken from the docker.com development swarm article. By default TLS is not enabled so connections are not secure and could be eavesdropped. Make sure you run this on a private/trusted network and when ready look into securing the docker daemon with TLS.