Build a Timelapse Rig with your Raspberry Pi
I spent a long weekend in the Peak District in the UK - a breathtaking National Park.
I knew we were staying in a cottage with a great view so put together a timelapse rig with the new IoT PiZero and Docker.
Let's start at the finished product and work backwards to the PiZero camera and Docker.
The final video
This is the video created from 4 days worth of still images captured every 1 minute. Photos are only taken between a set time-range to preserve space on the SD card. The size of the images is around 2MB each - so we're looking at roughly 1.3GB per day.
Follow and subscribe:
Please follow me on Twitter and Subscribe on YouTube for more hacks, tutorials and projects.
Overview
I'll now give an overview of the software and hardware used followed by the tutorial.
Hardware
Bill of materials
I expect most people reading may have a Pi or a Pi Camera, but if you don't here's a full bill of materials:
- Official 8 Megapixel PiCamera 2.1 - ThePiHut - 24 GBP
- Pi Zero camera cable - ThePiHut - 4 GBP
- Raspberry Pi Zero W - Pimoroni - 10 USD
- 8GB Noobs SD card - Pimoroni - 6.50 GBP
- 2A 5v power adapter - ThePiHut - 5 GBP
This does start to add up (about 45-50 GBP), but most of these components have been around so long that you probably won't have to buy everything new.
Optional extras:
- ZeroView (ThePiHut) - 7 GBP
Raspberry Pi
I used a Raspberry Pi ZeroW which has built-in WiFi and Bluetooth without the need for additional dongles.
Any Raspberry Pi will be fine for this setup, but the Zero is small and compact
Mounting
Mounting the Pi Zero can be hard - the new PiZeroW has a case lid that can mount a camera, but it is awkward to position for a photography through a window.
I opted for the ZeroView product by ThePiHut which mounts neatly onto a window facing outwards. It is quite brittle, so be careful not to apply too much force when sticking it onto windows.

Cabling
I've learnt the hard way that power sockets are not always where I'd want them to be, so I came armed with a thick gauged USB cable and 3A 5V power supply. This meant I could just about reach the best window overlooking the old millpond.
The PiZero needs a different cable to attach to the Raspberry Pi camera. Here are some pictures to show you which way around to connect the components:
If you're re-connecting a @Raspberry_Pi camera cable to your #pizero or #PiZeroW make sure you get everything the right way up! pic.twitter.com/p3zL6vi9NV
— Alex Ellis (@alexellisuk) March 8, 2017
SD Card
I used a 16GB class 10 Samsung EVO SD card - this would give me plenty of space for a long weekend at around 1.3GB / day.
The new Zero has built-in WiFi so you can benefit from plugging in a nano-sized USB pen-drive while still having connectivity.
Software
We'll now run through the software used and configuration needed to power the photo capture.
Phototimer
I'm using a Python project called phototimer - it orchestrates the raspistill command-line which is bundled with Raspbian.
You can use raspistill to take a series of photos but by using Python I was able to add some key features:
- Define your daylight hours (no shots of total darkness)
- Create a set of date-based folders after taking each photo such as:
/var/image/2017/3/8/9
Photos for 9am on the 8th of March 2017.
- Configuration through a file instead of having to remember CLI options
- Sensible fine-tuned defaults
No extra dependencies are required other than Python and Raspistill. I'm also going to bundle the software with Docker.
Edit: an experimental version is also available using the picamera library.
Docker
You can run phototimer on Raspbian Lite with Python installed, but bundling with Docker means:
- Automatic restarts of the time-lapse
No need to log in with SSH when you come to a new location. The time-lapse will restart.
- Easy setup
No need to git clone for each device - just pull down the Docker image, enable the camera interface and run a container.
- Easy access to logs
Docker will maintain your logs and allow you to re-attach to the container at any time.
Video editiing
I created the video with a Mac and the iMovie app. Simply follow these instructions:
- Drag all the photos into the "imported media" icon
- Drag the imported files onto the timeline (they will be in the correct order)
- Set the crop factor to "fill"
- Change the show-time per frame from 4.0 seconds to something much quicker like 0.1 seconds
Now export your video as a file and upload to YouTube or Vimeo etc.
Edit: Generating video on the Pi
A few folks suggested editing or compiling video on the Pi Zero itself. I would not recommend going down this route due to memory and CPU constraints. For ad-hoc / occasional timelapses you will get a better experience and more timely result editing with a laptop or PC.
Linux does have video/image-processing tools - checkout projects like aconv (part of libav) or ffmpeg. These could be used with a more powerful PC/laptop for generating a video from your still photos.
Tutorial steps
Before powering up make sure you've plugged in the Raspberry Pi camera.
After logging into the Raspberry Pi for the first time enable the camera interface.
1. Enable RPi camera
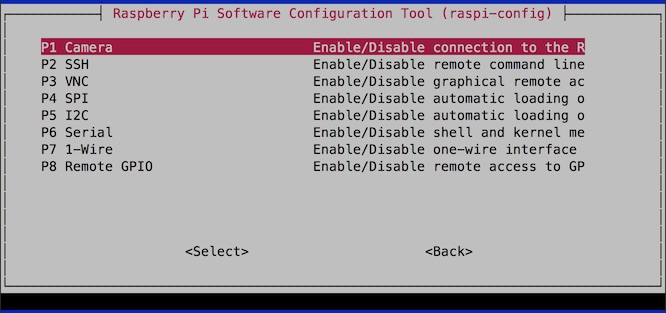
Type in sudo raspi-config then head over to "Interfacing Options" and enable the camera interface, then reboot the Pi.
2. Install Docker
Now install Docker with the following two commands:
curl -sSL get.docker.com | sh
usermod -aG docker pi
3. Change the default password
Make sure you change the password for the pi account by typing in: passwd
4. Clone the phototimer Github repository
Now clone the phototimer code:
$ git clone https://github.com/alexellis/phototimer
If git is not available then install it with sudo apt-get install -qy git.
5. Edit the config file
You can customise your time-lapse by editing the config.py file.
- Set the hours
By default the time-lapse begins at 4am and finishes at 8pm - so you will probably want to change this to suit your needs.
- Set the quality level
Surprisingly a quality level of 35/100 is still very clear and results in a much smaller image than 60-80/100. You can tweak the file and calculate how much disk space you need.
- Flip the image
Depending on how you've mounted your camera you may need to flip the image around Horizontally or Vertically. Just put True or False on either - these are case-sensitive.
- Height and Width
You can tweak the height and width - which can be useful if you need a certain aspect ratio. I use the default value.
config = {}
config["am"] = 400
config["pm"] = 2000

config["flip_horizontal"] = True
config["flip_vertical"] = False
config["metering_mode"] = "matrix"

config["base_path"] = "/var/image"
config["height"] = 1536
config["width"] = 2048
config["quality"] = 35
config.py
Note that every time you edit your config you will need to re-build and restart your Docker container.
6. Build a Docker container
When Docker runs a build it will creates an image from the code in the current directory and a selected base image such as Debian or Alpine Linux. If you want to know more see the Dockerfile here.
$ mkdir -p /var/image/
$ docker build -t alexellis2/phototimer:0.1 .
The main thing is that everything our program could need is included in the image we build right here.
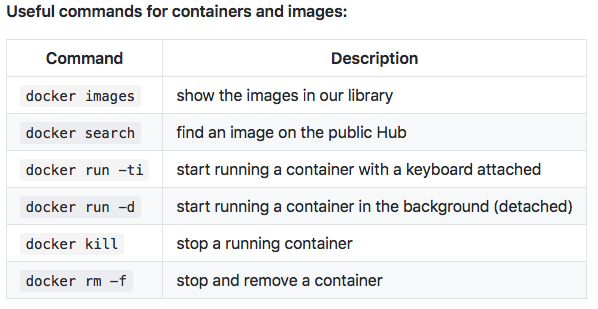
You can learn more about Docker in my Hands-On Video Docker for the Raspberry Pi.
Here are a few shortcuts and CLI commands that are useful for beginners:

7. Start the timelapse
$ docker run --name capture -v /var/image:/var/image --privileged --restart=always -d alexellis2/phototimer:0.1
This is what the options mean:
--restart-alwaysif the machine is restarted or the code exits the container will continue taking photos-dthis runs the container in the background--privilegedroot access is needed to access the camera-v /var/image:/var/imagethis shares the/var/imagefolder from your Pi into the Docker container so the photos it captures are accessible
7.2 Tell Docker your timezone
By default the Docker container will run in the UTC timezone. Your daylight hours will be calculated according to that timezone, so if you live somewhere else you will want to override it.
You can tune into your local timezone with the following extra parameter to docker run for London:
-e TZ="Europe/London"
So for a time-lapse in Austin, USA (CDT) you'd have something like this:
$ docker run --name capture -v /var/image:/var/image --privileged --restart=always -e TZ="US/Central" -d alexellis2/phototimer:0.1
8. Copy the files back to your laptop
After you've taken a few snapshot you can download them to your laptop like this:
$ scp -r pi@raspberrypi.local:/var/image ~/Desktop/
If you're using Windows then you can install Git for Windows and this will provide the ssh and scp commands.
9. Connectivity options
If you want to take your new rig away with you like I did above then you will need a way of connecting to the device when away from your WiFi router. Here are a few suggestions:
- Use a USB OTG cable
All versions of the Pi Zero support networking over USB which is very easy to setup and won't interfere with your WiFi connection. You will need to take a USB cable with you - then you can use this in each new location to edit the WiFi SSID/password on the Zero directly.
- Drop a
wpa_supplicant.conffile into /boot
As long as you have an SD card reader handy when travelling you can drop a new wpa_supplicant.conf file into /boot by plugging in the SD card. This will be copied over the current configuration on the next boot.
- Setup the RPi as a WiFi hotspot
If you're a confident Linux user you can follow a guide using the hostapd package to make the RPi its own hotspot. This means you can connect to the RPi from anywhere but you won't have any internet access.
There is one more gotcha with this approach - the Raspberry Pi does not have a hardware clock - so whatever day it is when you unplug will be the day the Pi thinks its on when you boot up.
Or if you're not going to use the rig away from your usual location, then setup your regular WiFi SSID and password and connect as needed over WiFi to start/stop the timelapse capture and to download files.
Wrapping up
This completes the tutorial steps, you can now have everything you need to create your own videos:
- Use Docker to run run the Python phototimer application
- Fine tune your options through the
config.pyfile - Download the .jpg files over SSH (scp/sfp) whenever you need
- Create a video with iMovie on a Mac
Next steps:
Please follow me on Twitter and Subscribe on YouTube for more hacks, tutorials and projects:
Build your own @Raspberry_Pi timelapse with my new tutorial using @docker and Python. #PiZeroW @ThePiHut https://t.co/AYsQTJWRMh pic.twitter.com/Avk59XUsoK
— Alex Ellis (@alexellisuk) March 8, 2017
Related links:
-
Learn the basics of Docker in this video: Hands-on Docker for Raspberry Pi
-
Fork and star the Phototimer code on Github
-
Read about my previous time-lapse attempt: Portable wildlife timelapse (2015 blog)