PiWars V2.0
The basic concept of PiWars as detailed on the official website is that competitors pit their robots against each other in a series of challenges to earn points. At the end of the day prizes are given out for various objective and fun categories such as Robot with most LEDs etc.
Update: 20th Feb, 2017
Python code is now available at alexellis/wild_robot.
If you've ever seen the TV classic of Robot Wars then think of this as a toned-down version of that where the Raspberry Pi is king and everyone gets to go home with their robots in one piece at the end.
PiWars 1 vs 2.0
The first PiWars was held in part of the Cambridge Astronomy campus in 2014, I took along a small yellow robot which I had converted from an RC car and won the best non-competing robot category. It was a complete geek-fest with robots of all shapes and sizes entered by individuals, colleagues, parents with children and a couple of school classes.
This year PiWars was rebooted at the Cambridge Computer Laboratory - a spacious hall with canteen, lecture halls and additional rooms for the competitors to go to and tweak their robots. The organisers had clearly spent a huge amount of time designing all the courses from the hardest obstacle course I've ever seen to Pi Noon (pop the balloon) to skittles to a printed rubber mat for line following.
My Robot
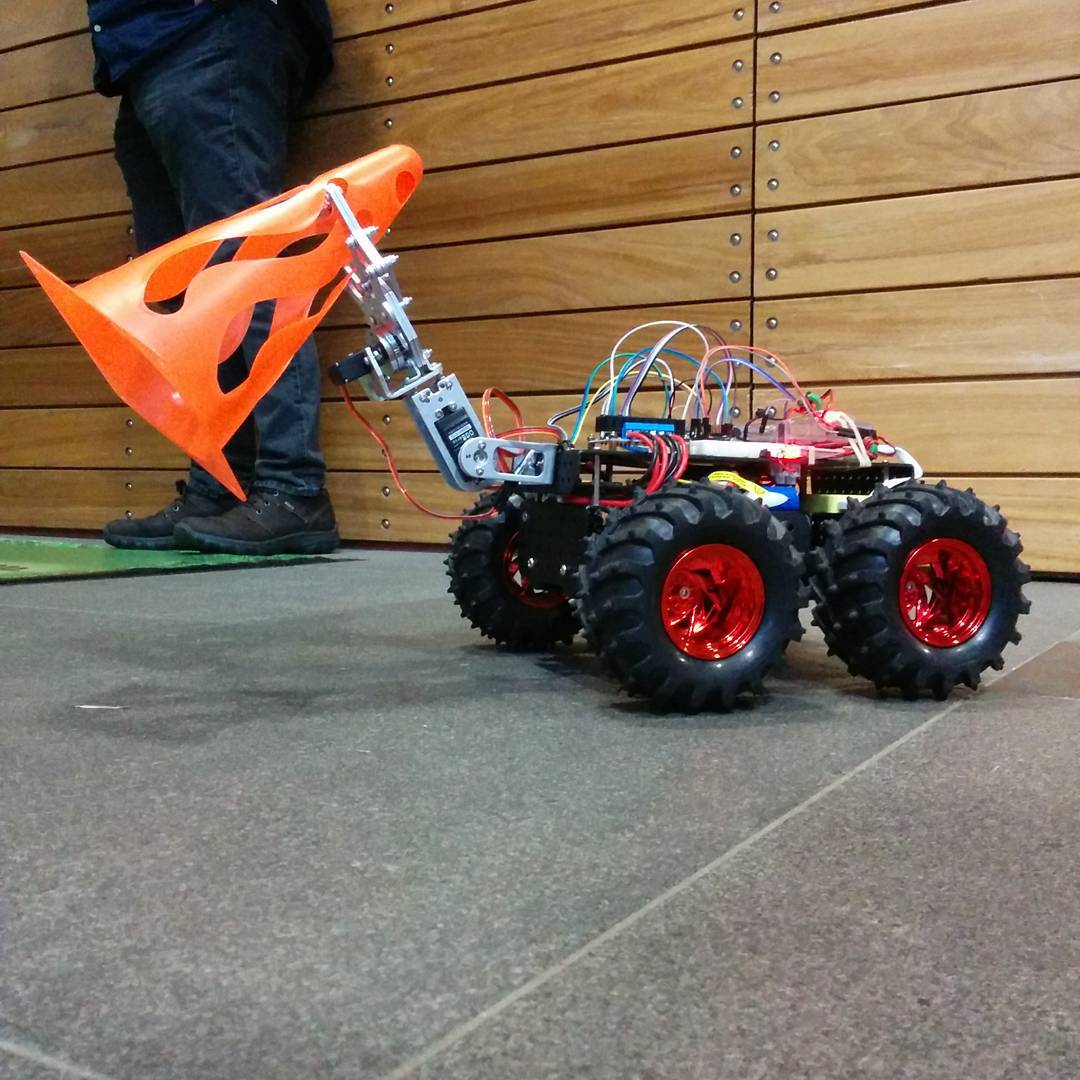
I had planned to enter a robot this year, but decided to go for a brand-new chassis and that presented some unexpected problems. My robot was only really ready for the obstacle course and would have needed much more work for the autonomous challenges. So I brought it along as a spectator and had some fun dragging chairs across the floor and playing with the cones.
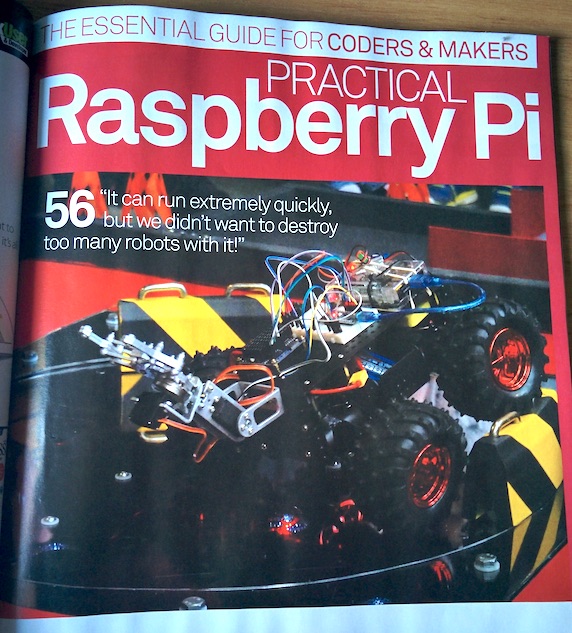
I caught the eye of Linux User and Developer magazine using my robot's arm to take part in a skittles competition.
This really caught the eye of Gavin Thomas from Linux Developer and User magazine who went on to take a quick interview about my robot and then published a full page photo of it in the middle of the obstacle course in issue: 161. It was a nice surprise so I've bought a copy to put away.
The build
Most of what you can see is from a kit called the Wild Thumper manufactured by Dagu in the far east. I bought mine from Robosavvy but a few other places also stock the kit.
The base kit includes:
- 4x 75:1 geared brushed motors, which stall at 6A each
- 4x all-terrain tyres and hubs to connect to the motors
- Heavy duty metal chassis
- Full suspension for each wheel
- Robotic arm with 2 DOF driven by 2x metal-gear servos
In addition to the base kit I had to do quite a bit of work to find an affordable motor controller, write code to connect the Arduino and a PS3 controller. It is primarily direct-drive from the controller.
- Raspberry PI 2
- 1x Arduino Nano clone to generate servo and PWM pulses
- Edimax WiFi dongle
- Racksoy Bluetooth dongle
- PS3 Controller (must be genuine, not a copy)
- 1x 5600mAh generic USB battery pack from eBay to power the RPi
- Generic dual motor controller (digital) supporting 60A continuous draw
- 2 cell 5000mAh LiPo battery (~7.2v) for the motors and servos
- 2x UBEC - one for the servos and another for the PI.
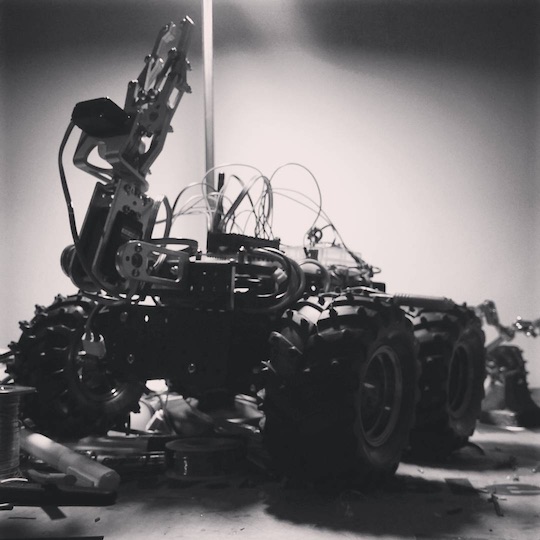
Final checks in the workshop before the event
How it works:
In my PiWars 1.0 robot I used the RPIO.PWM library to generate PWM pulses through software and the PI's DMA interface. This library has sadly been abandoned by the author - from what I have seen on the Github issue tracker a lot of work would be required to support the Pi2. This made me look to the Arduino Nano - as a co-op board, they are effectively cheaper than £2.00 and very easy to program.
Motors
The Arduino is responsible for sending left/right, forward/back and servo positions through to the motor controller and servos. I needed something that could drive a motor controller reliably and I settled on an Arduino which excels at generating the required signals.
I connected the Arduino (at 5v) to the Raspberry Pi (at 3.3v) through a short USB cable meaning I do not need to worry about any voltage differences.
An Arduino can be connected to an RPi through serial cable with a logic level converter or through a USB cable without extra electronics.
Writing a simple comms. protocol:
I then opted for a simple one-way message from the Pi to the Arduino of a fixed length:
050:050:000:000:090:090

Forward left @ 50
Forward right @ 50
Reverse left/right @ 0
Servo 1 angle @ 90 degrees
Servo 2 angle @ 90 degrees
While there are other ways of doing this, it appeared to have very little lag or jitter so I kept things simple.
Controls & comms
I paired the bluetooth controller to the PI with a program called sixaxis, then installed bluez tools packages and set the bluetooth service to start on boot-up. In my main program (written in Python) I make use of the pygame library for reading the buttons and stick positions and then feed that into the Arduino.
I also set up a WiFi dongle to connect to a hotspot on my phone - this lets me upload/edit/debug code, upgrade the base system and start/stop the code. With the original robot and its single USB port - I had to reboot every time I wanted to use WiFi or Bluetooth, this is much more time-efficient.
If you want to use a PS3 dual-shock controller it has to be a genuine product or the Pi won't be able to pair wirelessly.
Code
Update: 20th Feb, 2017
Python code is now available at alexellis/wild_robot.
The Arduino's code is written in C and involves some basic string parsing and then GPIO/servo messages. It's one-way communication meaning I can keep the code concise.
Control loop:
The Raspberry Pi code was written in Python with unit testing in mind, I have fake joystick and Ardiuno classes which let me code on my laptop instead of on the device directly. I also wrote unit tests against the string formatting I mentioned above for the motor/servo messages.
Where next?
This is still very much a work in progress, but I will release some of the code to Github and hope that will be useful to some people.
I would like to add in a GPS receiver and digital compass, as long I can find a way to shield them from the motors and interference of the large metal chassis.
See also:
-
My PiWars 1.0 debrief where I re-purposed an old RC car and won the best non-competing robot.
-
Blog series on the Raspberry Pi and Docker
Share & Follow on Twitter
12 months ago I built a @Raspberry_Pi #robot that could move furniture. Blog + Python code @ https://t.co/MbqHSE3Twh #learnpython pic.twitter.com/RB3qq79PqL
— Alex Ellis (@alexellisuk) February 20, 2017