Get Started with Docker on Raspberry Pi
I have put this guide together to help you get started with Docker 1.12 (or newer) on your Raspberry Pi. For simplicity we will use the default operating system for the Pi - called Raspbian. This guide currently works with most models of Raspberry Pi and I'd recommending using the Model B 2/3 or Zero.
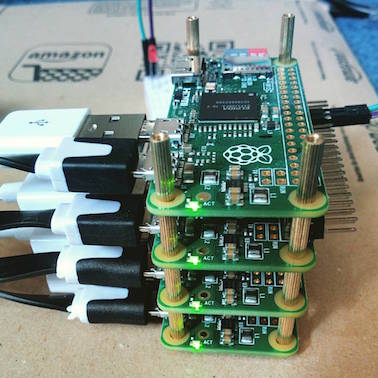
Raspberry Pi Zero Cluster
Don't know what Docker is yet or what you could use it for? Check out Understanding Docker from the offical docs.
Already using Docker on your Pi?
Head straight over to my Live Swarm Deep Dive video where we connect multiple Raspberry Pis to together to create a Docker Swarm.
Preparing the SD card
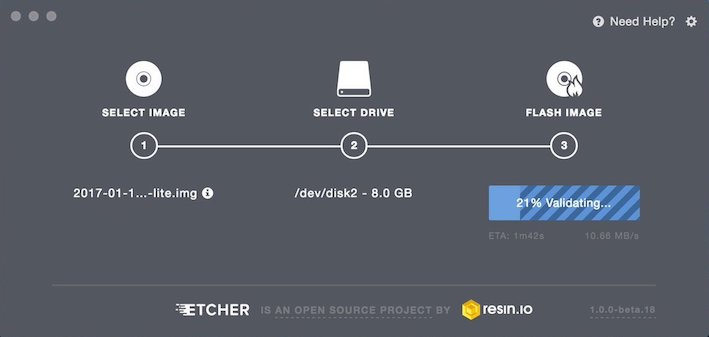
Download the latest Raspbian Jessie Lite image from https://www.raspberrypi.org/downloads/raspbian/.
The Raspbian Jessie Lite image is the same as the regular image but only contains the bare minimum amount of packages.
I used to give instructions for using dd on Mac and Linux with a third option for Windows. Now I recommend Etcher.io which will flash your SD card in the same way whichever of those Operating Systems you use on your PC/laptop.
Download Etcher here:
Now follow the instructions in Etcher to flash your SD card. There is one more thing we have to do before ejecting the SD card.
- Enable SSH on the SD Card
To help prevent Raspberry Pis around the globe from being hacked the RPi foundation have now disabled SSH on the default image. Just create a text file in /boot/ called ssh - it can be blank or you can type anything you want inside it.
Make sure it has no extension such as ssh.txt - it must just be
ssh.
Now insert the SD card, networking and power etc.
Install Docker
Once you boot up the Raspberry Pi you will be able to locate it on your network through the bonjour/avahi service.
Connect with SSH
$ ssh pi@raspberrypi.local
The password is raspberry.
For security reasons it is advisable to change the password of the user pi with the passwd command.
Optional customizations
At this point you may want to edit the hostname of the Pi. Use an editor and change the word raspberrypi to something else in:
- /etc/hosts
- /etc/hostname
If you are using the Pi for a headless application then you can reduce the memory split between the GPU and the rest of the system down to 16mb.
Edit /boot/config.txt and add this line:
gpu_mem=16
Start the Docker installer
An automated script maintained by the Docker project will create a systemd service file and copy the relevant Docker binaries into /usr/bin/.
$ curl -sSL https://get.docker.com | sh
Until recently installing Docker on a Pi was a very manual process which often meant having to build Docker from scratch on a very underpowered device (this could take hours). Lots of hard work by ARM enthusiasts Hypriot has helped make .deb packages a first-class citizen in Docker's own CI process.
If you would like to opt into using a testing version then replace get.docker.com with test.docker.com. This will bring down a newer version but it may still have some open issues associated with it.
Beware that this work does not extend to non-Debian distributions such as Arch Linux or Fedora. Arch Linux for ARM currently has Docker 1.11 available in its package manager
pacman.
Configure Docker
There are a couple of manual steps needed to get the best experience.
Set Docker to auto-start
$ sudo systemctl enable docker
You can now reboot the Pi, or start the Docker daemon with:
$ sudo systemctl start docker
Enable Docker client
The Docker client can only be used by root or members of the docker group. Add pi or your equivalent user to the docker group:
$ sudo usermod -aG docker pi
After making this change, log out and reconnect with ssh.
Using Docker
Support for ARM and the Raspberry Pi is a work-in-progress item which means there are a few things you should know.
Pulling images from the Hub
If you pull down the busybox image from the Docker hub it will not function correctly. This is because the contents are designed for a regular PC or the x86_64 architecture. There are on-going efforts to fix this in future versions of Docker.
We should only attempt to use images which we know are designed to work on ARM. At present there are no strictly official images but the Docker team maintains a number of experimental images under the prefix arm32v6.
Update 30th May 2017: the
armhfaccount has been renamed toarm32v6- so for future reference use thearm32v6prefix instead.
Running your first ARM image
Let's try starting Docker's official Alpine Linux image arm32v6/alpine. Alpine Linux is a very compact 1.8MB download.
$ docker run -ti arm32v6/alpine:3.5 /bin/sh

/ # cat /etc/os-release
NAME="Alpine Linux"
ID=alpine
VERSION_ID=3.5.2
PRETTY_NAME="Alpine Linux v3.5"
HOME_URL="http://alpinelinux.org"
BUG_REPORT_URL="http://bugs.alpinelinux.org"

/ # echo "Hi, this is a tiny Linux distribution!" | base64
SGksIHRoaXMgaXMgYSB0aW55IExpbnV4IGRpc3RyaWJ1dGlvbiEK

/ # echo "SGksIHRoaXMgaXMgYSB0aW55IExpbnV4IGRpc3RyaWJ1dGlvbiEK" | base64 -d
Hi, this is a tiny Linux distribution!

/ # exit
Try the image and type exit when you are finished.
We launched sh - a BusyBox shell, but we could have launched any command directly.
Here's another example without using the shell - we just run the date binary directly:
$ docker run arm32v6/alpine:3.5 date
Sun Mar 12 21:00:45 UTC 2017
Other base images
An image made by Resin.io is used by the current Docker build process to create a base image which is usable on all supported versions of the Raspberry Pi. It is a light-weight version of Raspbian Jessie which makes it a good choice.
Build a new image
Build your image like a regular Docker image but use resin/rpi-raspbian as your base. Let's add curl and ca-certificates and create an image which will access docker.com.
FROM resin/rpi-raspbian:latest
ENTRYPOINT []

RUN apt-get update && \
    apt-get -qy install curl ca-certificates

CMD ["curl", "https://docker.com"]
Line-by line breakdown:
- FROM - this statement is the first in the file and picks what base system to start making changes on top of
- ENTRYPOINT [] - the Resin image has a pre-defined start-up instruction so this line cancels that out allow us to use our own.
- RUN - each step prefixed by RUN is executed by bash. So here we install curl and common SSL certificate
- CMD - this is the start-up command for the container, it's invoked by
docker run
So build the image like this, and then run it:
$ docker build -t curl_docker .
$ docker run curl_docker
After building an image with Docker you will see it in your library. Use the docker images command to see all the images you've built so far.
If you want to delete the curl_docker image type in: docker rmi curl_docker.
The same with Alpine Linux
Alpine Linux doesn't use apt-get to package its packages but a tool named apk, here's how to achieve the same thing:
FROM arm32v6/alpine:3.5

RUN apk add --no-cache curl ca-certificates

CMD ["curl", "https://docker.com"]
To build and run the Alpine container, you can do exactly the same thing or use a different image name:
$ docker build -t curl_docker_alpine .

Sending build context to Docker daemon 2.048 kB
Step 1/3 : FROM arm32v6/alpine:3.5
 ---> 4c5b559db95b
Step 2/3 : RUN apk add --no-cache curl ca-certificates
 ---> Running in 68254b2889a0
fetch http://dl-cdn.alpinelinux.org/alpine/v3.5/main/armhf/APKINDEX.tar.gz
fetch http://dl-cdn.alpinelinux.org/alpine/v3.5/community/armhf/APKINDEX.tar.gz
(1/4) Installing ca-certificates (20161130-r0)
(2/4) Installing libssh2 (1.7.0-r2)
(3/4) Installing libcurl (7.52.1-r2)
(4/4) Installing curl (7.52.1-r2)
Executing busybox-1.25.1-r0.trigger
Executing ca-certificates-20161130-r0.trigger
OK: 4 MiB in 15 packages
 ---> ecd945783503
Removing intermediate container 68254b2889a0
Step 3/3 : CMD curl https://docker.com
 ---> Running in ed6a0a7afcef
 ---> c911937ccb69
Removing intermediate container ed6a0a7afcef
Successfully built c911937ccb69

$ docker run curl_docker_alpine
Create a Node.js application
This Dockerfile uses Resin.io's Raspbian image as a base and pulls down Node 4.5 LTS from the official Node.js site.
FROM resin/rpi-raspbian:latest
ENTRYPOINT []

RUN apt-get update && \
    apt-get -qy install curl \
                build-essential python \
                ca-certificates
WORKDIR /root/
RUN curl -O \
  https://nodejs.org/dist/v4.5.0/node-v4.5.0-linux-armv6l.tar.gz
RUN tar -xvf node-*.tar.gz -C /usr/local \
  --strip-components=1

CMD ["node"]
To build and run the image:
$ docker build -t node:arm .
$ docker run -ti node:arm
>
You can now test out a few Node.js instructions or fork my simple hello-world microservice on Github to take it further.
> process.version
'v4.5.0'
> var fs = require('fs');
> console.log(fs.readFileSync("/etc/hosts", "utf8"));
> process.exit()
$
Make use of GPIO
In order to make use of additional hardware and add-on boards you will need to access the GPIO pins. These require an additional flag at runtime of --privileged to allow the container to write to the special area of memory managing GPIO.
The standard RPi.GPIO library will work through Docker including the libraries from several hardware manufactures.
This is a sample Dockerfile for using the defacto RPi.GPIO library.
FROM resin/rpi-raspbian:latest
ENTRYPOINT []

RUN apt-get -q update && \
	apt-get -qy install \
        python python-pip \
        python-dev python-pip gcc make

RUN pip install rpi.gpio
Build this image as a basis for adding your GPIO scripts at a later date.
$ docker build -t gpio-base .
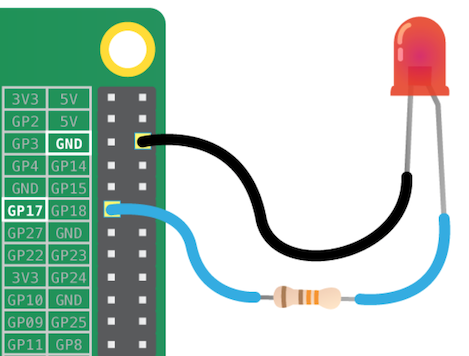
The following Python code can be used to will blink an LED connected to GPIO pin 18.
import RPi.GPIO as GPIO
import time
GPIO.setmode(GPIO.BCM)
led_pin = 17
GPIO.setup(led_pin, GPIO.OUT)

while(True):
    GPIO.output(led_pin, GPIO.HIGH)
    time.sleep(1)
    GPIO.output(led_pin, GPIO.LOW)
    time.sleep(1)
app.py
Just use ADD to transfer the script into a new image depriving from gpio-base:
FROM gpio-base:latest
ADD ./app.py ./app.py

CMD ["python", "app.py"]
You will need to run this container in --privileged mode in order to be able to access the GPIO pins.
$ docker build -t blink .
$ docker run -ti --privileged blink
If you enjoyed that then how about making an Internet-enabled buzzer or cheerlight? Here's an example of using the Python Flask library to create a web server that controls a GPIO pin:
For more on interacting with GPIO head over to the Raspberry Pi Foundation's Getting Started with Physical Computing worksheet.
Feedback & questions
Contact me via Twitter @alexellisuk or in the comments section below. What do you want to see on the blog next? Have you tried it out? Let us know!
Resin.io recently changed their base image so instead of using
resin/rpi-raspbian:jessiethey are suggesting we useresin/rpi-raspbian:jessie-20160831.
See also:
-
Star or fork my docker-arm repo on Github for a list of useful Dockerfiles and information on Docker Swarm.
-
Build your Pi Zero Swarm with OTG networking only - look ma, no Ethernet!
-
Hosting series - How I self-host this blog on a Pi